


Monday, March 31, 2008

Thursday, March 27, 2008
Got Gohan?
 Play Food - Gohan(rice) Bags
 At my dinner table it's all about the rice. So it made perfect since to create a bag of rice for my daughter's play kitchen. And as far as I know, there isn't a toy rice bag on the market. Let me know if you see one. Well, after a 15lb bag of rice consumed by the family, trial and error, and an incident involving my hair and hot glue, the toy rice bag was born. Directions Below.
Supplies
rice bag
hot glue
toothpicks
paper
scissors
sewing pins
1. Cut a piece of paper to 6 1/2" by 5". This will serve as your pattern.
2. Pin the paper to the part of the bag that will be the front. Cut out.
3. Pin the paper to the part of the bag that will be the back(I used the nutrition facts). Cut out.
 4. Place wrong sides together and glue three sides. You will want to use a liberal amount of glue to insure the bag will stay together. For best results do one side at a time. Use a toothpick to seal both pieces together. Some of the glue will seep out of the sides. This will seal the edges. Once the bag is finished you can go back and cut the glue off that's showing.
5. Fill the bag half full with rice.
6. Seal the last side with hot glue just like in step 4. Trim edges as needed. Done.
*This toy is for children who know the distinction between real and fake food. Age 3 + recommended

Wednesday, March 26, 2008
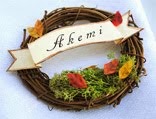
Chicks


A family friend gave these cute little chicks as an Easter gift to my children. The chicks are glued inside to what looks like green raffia grass. I'm going to hang this somewhere in the children's room. This was such a cute idea, I just had to share it.
This would be a great way to package a homemade plush toy. Just an idea.
This would be a great way to package a homemade plush toy. Just an idea.
Thursday, March 20, 2008
How To Make a Basket Pincushion

 Looking over at my sad, tired pincushion, I new it was time for a change. My old one was the standard tomato and it had served me well. It had been with me through prick and pin. It stood by my side in my first sewing class. Farewell, tomato.
Seriously, this pincushion was inspired by all the Easter baskets I've seen lately. There is no sewing involved and it only takes about ten minutes to make. I made the pins as well. They're more for looks than anything else. I'm not sure if you would want to use them for sewing honestly. Directions for both projects below.
Pincushion Basket
Supplies
small basket
scraps of fabric, depends on the size of your basket
hot glue
stuffing
*If your basket has a more open weave, you will want to line the inside with the fabric you are using. This will prevent seeing the stuffing and having it come out of the sides. I had to do this for the bottom of my basket. Just glue the fabric to the inside of the basket.
1. Stuff the basket with filling.
2. Cut out a piece of fabric that is the shape of the opening of your basket with 1 inch seam allowance.
3. Place the fabric on top of the stuffing and tuck it in all around the sides so you can't see the raw edge of the fabric.
4. Pull back one little side of fabric and place the glue low enough where it can't be seen, push fabric back against it. Go around the whole basket doing this. Done!
* make sure the filling is packed in well and the fabric is as tight as possible.

Mushroom Pin Directions
Supplies
paper clay ( I get this at Daiso)
sewing pins
acrylic paint in white and red
1. Make a small mushroom shape out of the clay.
2. Insert the pin in the bottom of the mushroom, reshape the mushroom if necessary.
3. Let dry for a day.
4. Paint the top red, let dry. Paint white dots on the top. Done.

paper clay ( I get this at Daiso)
sewing pins
acrylic paint in white and red
1. Make a small mushroom shape out of the clay.
2. Insert the pin in the bottom of the mushroom, reshape the mushroom if necessary.
3. Let dry for a day.
4. Paint the top red, let dry. Paint white dots on the top. Done.

Monday, March 17, 2008
Grow Your Own Easter Grass
 My Mother in Law planted this grass in the kids Easter baskets. What a nice alternative to the fake plastic grass, don't you think? All you need to do is line a basket with plastic wrap. Add some soil, add some grass seed (we used wheat grass), add water, and place in the sun. It takes a little less than a week to grow so there's still time if you want to make one for Easter. This also might make a nice dinner table centerpiece. If you don't have a basket, a nice bowl/dish would work as well.
Wednesday, March 12, 2008

Monday, March 10, 2008
Knit Easter Bonnet
 Here's another hoodie/bonnet inspired by the Lion's Brand Pattern. Directions below if you would like to make one.
Supplies
Size 8 needles
100% cotton 4 ply yarn
SK2P - Slip 1, knit 2 together, pass slip stitch over k2tog.
*Directions are designed to fit a 2 year old.
1. Cast on 73 stitches with green yarn
2. Purl across entire row
switch yarn to pink
3. K1, *yo, k1, SK2P, k1, yo, k1; repeat from * to end
4. Repeat rows 2 and 3 until piece measures 8 inches. (use same color yarn for the following rows).
Finishing
With right sides facing together, 3 needle bind off
Weave in loose ends
Ties
Cut 6 strands of yarn 30 in long each.
Divide into two groups.
On the bottom corner of the bonnet thread the three strands. Braid till piece measures 10 inches, knot, trim. Repeat on opposite side.
* rows 2 and 3 are a quill eyelet pattern ( multiple of 6 sts plus 1)
Saturday, March 8, 2008
Where My Peeps At
 Here's a fun idea for the Easter breakfast table, peeps in hot chocolate. Peeps are basically marshmallows covered in yellow sugar. Make sure to put the peeps in just before serving, after a while they will begin to melt and tip on their sides.
Wednesday, March 5, 2008
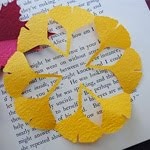
Easy Paper Candy Favors
 Here's an easy favor to make to fill with candy or other small items. This idea came from a friend and I thought I would share it with all of you. The paper used for the favors was made with a stamp from mushroommeaddows. Wrapping paper also works well for this project.
Suppplies
3" by 5 1/2" paper
double sided tape - scrapbook type that roll on (you could also use glue)
 Flip paper upside down. Fold paper to make a small tab (refer to picture). Where yellow lines are, place double sided tape.
 Fold in half to make a little pouch like the picture above. Seal the bottom.
 Fill with candy. Squeeze sides togeather to seal. The favor should resemble a triangle.
 Done!
Done!Tuesday, March 4, 2008
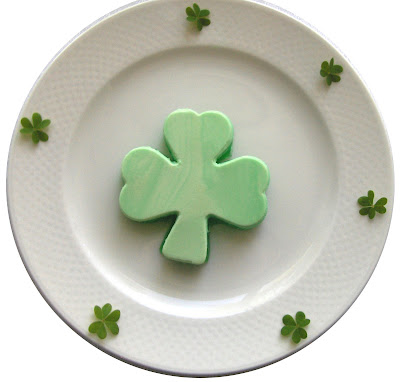
How To Make Jello Shamrocks
 Here's an easy Jello recipe which is great for potlucks. Enjoy.
Ingridents:
2 boxes of 3oz Lime Jello (or any flavor you like)
2 cups of water
3/4 cup of cream
2 boxes of 3oz Lime Jello (or any flavor you like)
2 cups of water
3/4 cup of cream
Directions
1. Boil 2 cups of water.
2. Add the 2 packets of Jello, mix till it has dissolved
3. Pour into a 13" by 9" glass pan, let stand for 10 minutes.
4. Pour in cream, mix.
5. Refridgerate till jello sets up.
6. Cut out with cookie cutters.
* The cream will separate on it's own creating the two layers.
* This also looks nice cut into simple small squares.

Sunday, March 2, 2008
HAPPY GIRL'S DAY
 "My daughter's Girl's Day Doll"
"Hinamatsuri, the Doll Festival is a celebration for Japanese girls and is held each year on March 3rd. According to custom, when a girl is born in a Japanese family, she receives a set of dolls which represent the court of Heian Japan (794-1185). The dolls are displayed on Girl's Day and a special meal is prepared.

"Nikkei Donburi" by Chris Aihara

"Girl's Day Snacks" - Look at the cute Emperor and Empress on the packaging.


Blogging Cards
 I decided to make some new little blog cards to go with the new look of the site. These are nice to have on hand when someone is interested in your blog. I can't tell you how many times I've dug around in my purse only to find an old wrinkled reciept to write on. Tacky, I know.
These cards were made in Adobe Illustrator. You could easily make a cute card in Microsoft Word as well. If you don't want to do it yourself, you might want to try MOO cards. Another option is Vista Print, they will print free business cards for you, the catch is there logo is on the back of the card.
Subscribe to:
Posts (Atom)
