Thursday, August 30, 2007
Sock and Roll Sushi
I don't know about you, but I love packaging. I'm always trying to think of innovative ideas for used packages, like this plastic take out container. Inside are six pairs of baby socks, 3 black, 3 white. All I did was roll one white sock up and roll a black sock around it. Then I secured it with a rubber band on the bottom. I used felt to cut out the fake tuna, green grass and ginger. To keep the gift in theme, I added a child's pair of chopsticks. Wouldn't this be a great baby shower gift. From first experience as a mother, I can tell you there's never enough socks. Don't ask me why.
When making this, keep in mind you want your lid to shut. That's why children's socks work best. Drop me a line if you have questions about this project. You can find my e-mail in the profile.
Friday, August 24, 2007
How to Make Tassel Earrings
These earrings were inspired by but what else, tassels! Only takes about 20min - 30min to make a pair. Directions below.
Wrap yarn around index card 11 times. Take a second piece of yarn and string in under all the yarn at the top of the index card, tie a knot.
Cut the bottom of the yarn so their are no more loops. Trim bottom of tassel so it's even.
Open up bell cap prongs with needle nose pliers. Place glue in side top of bell cap and glue the tassel to it. Pinch bell cap on all sides to hold tassel.
Bend wire with pliers(refer to picture above). String two beads on wire. Bend wire around earring hinge to attach tassel. Cut excess wire. Done
Supplies
Wrap yarn around index card 11 times. Take a second piece of yarn and string in under all the yarn at the top of the index card, tie a knot.
Cut the bottom of the yarn so their are no more loops. Trim bottom of tassel so it's even.
Open up bell cap prongs with needle nose pliers. Place glue in side top of bell cap and glue the tassel to it. Pinch bell cap on all sides to hold tassel.
Bend wire with pliers(refer to picture above). String two beads on wire. Bend wire around earring hinge to attach tassel. Cut excess wire. Done
Saturday, August 18, 2007
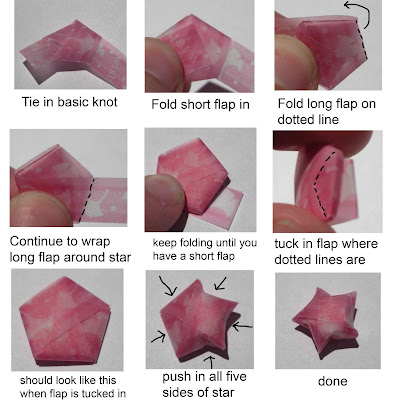
Rethinking Paper Lucky Stars
Remember lucky stars? You would make hundreds of them to fill a jar and give them to your friends. Why not reuse this simple craft for other things. Fill small gift boxes with them instead of tissue. This looks great for small things like jewelry. Use the stars for embellishments on cards. I made gift tags (pictured above) out of the paper one uses to make the stars. The paper comes in all kinds of great prints and phrases. Below is a picture of how the paper comes packaged. Usually costs about a dollar a package (30 strips of paper). Directions below
*If you don't want to buy the paper, you can cut the strips yourself with a light weight paper to
( 3/8" by 10"). It's also fun to print out your own sayings, then cut the strips.
*If you don't want to buy the paper, you can cut the strips yourself with a light weight paper to
( 3/8" by 10"). It's also fun to print out your own sayings, then cut the strips.
Monday, August 13, 2007
Knit Octopus Bath Mitt
Meet Oliver the Octopus. He's a bath mitt I made out of 100% cotton yarn. This would be a great gift for a baby shower. He knits up quick.
Octopus Bath Mitt Pattern
Supplies
Size 8 knitting needles
4 PLY Worsted Weight 100% cotton in cream and blue
Large sewing needle
With cream yarn cast on 44 stitches
Knit 36 rows of stockinette stitch
Row 37 (K2Tog, K4) repeat to end
Row 38 Purl
Row 39 (K2Tog, K4)
Row 40 Purl
Row 41 (K2Tog, K3)
Row 42 Purl
Row 43 (K2Tog, K2)
Row 44 Purl
Row 45 K2Tog across row
Row 46 Purl
Row 47 K2Tog across row
Bind off with Purl stitch
Leave a long tail to sew up body
Directions for tentacles
Cast on 70 stitches with cream yarn
Row1 Knit
Row2 K2Tog across row
Bind off with Knit stitch.
Leave a long tail to sew onto body
Make six tentacles
Assembly
Sew up body at seam just like making a hat
Sew tentacles inside of the bottom of the body
With blue yarn stitch eyes and smile (refer to picture) done
Wednesday, August 8, 2007
Tote Craft Project
I made this handbag out of two rice bags. We buy the large bags since we eat a lot of rice here. My husband would beg to differ. And after I made this tote, I just might agree with him. So buy some rice or hit up your local asian restaurant for a rice bag. Lets make a tote!
Supplies
two large rice bags
thread
ruler
scissors
sewing machine
Here's one of the rice bags I used. This is a plastic rice bag. The fabric ones are hard to find. Cut all around the edges of the bag to get two pieces per bag. Choose the the two best looking pieces and cut them to 17" by 11 3/4".
For the handles cut two strips of the rice bag to 16 1/2" by 3". Fold in half , wrong sides together, sew down the length of the strip.
Center handle to wrong side of bag and pin in place. Top stitch a box with an x to secure the handle. Refer to picture above. Do this for both handles.
Pin right sides of bag together. Stitch all around the edge of bag (refer to picture). Trim excess plastic. Mainly the bottom angled corners. Turn right side out. done
Saturday, August 4, 2007
Schultute (school cone) Craft Project
This is a smaller version of a schultute (school cone). The schultute is roughly the size of a megaphone. German children receive them from their parents on the first day of school (first grade only). It's thought to help ease the child into their first real day of school. They are filled with school supplies, toys, and treats. Often they are decorated with the children's interests, sports, cartoons, etc. Wouldn't this be great in replace of a gift bag.
Directions
Supplies
template click here
card stock (any color of choice)
decorative paper (I used wrapping paper)
embellishments - your choice (ribbon, beads, stickers, etc.)
crepe paper
white glue
scissors
1. Print template, trace on card stock, cut out.
template click here
card stock (any color of choice)
decorative paper (I used wrapping paper)
embellishments - your choice (ribbon, beads, stickers, etc.)
crepe paper
white glue
scissors
1. Print template, trace on card stock, cut out.
Glue card stock to back of decorative paper, let dry. Cut out around card stock.
Fold where dotted lines are on template to make cone. Glue on side tab to close. I used tape inside the cone to reinforce the bond.
Glue crepe paper along the inside edge of the cone. Let dry.
Now you can add your embellishments. I glued gold ribbon to the top edges of the cone. I also added some gold glitter paint to accent the labels on the cone.
Last add your gift inside ( nothing to heavy). Gather up the top of the crepe paper. Tie some ribbon around it. Done
Subscribe to:
Posts (Atom)