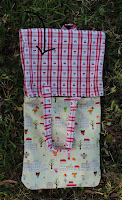
As promised here's the tutorial on how to make a picnic tote. When I was younger I used to have one of these bags made out of towels. For the longest time I kept it with the hopes of recreating the tote. I must of given up on the idea because I finally got rid of it. Now some ten years later, I wish I had the tote to compare. Isn't that always the case?
Supplies:
2 fabric squares 33" x 33" - this will be for the blanket
2 fabric rectangles 14" x 13" - one rectangle will be the outside of the bag and one will be the lining
2 fabric strips 3" x 25" - for the handles
matching thread
sewing machine
scissors
pins
 For the handles - fold one strip of fabric in half length wise. Sew down the length of the strip with a 1/4 inch seam. Press open seam. Turn inside out. Repeat for second handle. Set aside.
 Face squares (33" by 33") right sides together. Sew all along the edge with a 1/2 inch seam leaving a 5" opening at the center bottom. Trim corners and press open seams. Turn right side out. Sew around the perimeter with a 1/4 inch seam.
 Place both rectangles right sides together and sew a 3/8 inch seam along the perimeter leaving a three inch gap at the bottom (refer to red line). Trim corners and press seams open. Turn right side out.
 Pin rectangle to square, right side of fabric to wrong side of picnic blanket (refer to picture). Sew along the edge with a 1/4 inch seam (refer to red lines). Make sure when you sew the rectangle to the blanket you sew up the three inch opening that was on the bottom of the rectangle.
 Pin the handles three inches in from the inside of the rectangle. Sew on to the rectangle only, making sure not to attach the handles to the blanket. Use red lines as guide for sewing.
 Line up second handle just above the first handle. This handle will be sewn on the blanket only. Refer to red lines for sewing guides.
 Here's a close up view of the handles to see how they were attached.


22 comments:
adorable idea!!!!!
sew cute! thanks!
just to cute! Love the gingham too.
Great idea! Thanks!
This so so great! Fantastic idea - I'll be hunting down some gingham to have a go at it myself! Thanks for the tutorial
x
Thank you! I have a granddaughter that would love one of those!
how fun!
Just too cute! I must have that fabric the tote is made in!
This is totally awesome! I'm going to make one for a craft swap I'm currently involved in. Thanks SO MUCH for the tutorial and for your fantastic idea!
idea bellissima!!! anche per un ascigamano da portare al mare!!!!
I love it, i'll put it on my to-sew-list!!
how creative! I can't wait to make one for Amanda.
Great idea! worth waiting!
wow, great idea and it's so cute!
Awesome! My daughter has a towel that does that.
i love this craft idea, once i get my sewing machine i will make one too
Great tutorial! I´ve made my own now and it´s on my blog tomorrow.
Thank you!
This is so sweet. As soon as I get my sewing machine up and running again I want to make this!
see the picnic blanket tote I made by using your tutorial.
what an awesome idea! very practical. might have to make myself/my daughter one :)
such a cute idea
I have included this in my Gifts To Sew For Christmas round up
http://jojoebi.blogspot.com/2010/10/lots-of-gifts-to-sew.html
thanks
jo
Such a cute idea!
Just found you via sew mama sew =)
I just made a slightly bigger version for my friend's birthday, thanks so much for the tute!
Post a Comment