 I was looking through the new Pottery Barn (PB) catalog when I stumbled upon something that looked very familiar, paper stars. And they weren't just any paper stars but over sized lucky stars. Did anyone else catch that? Every year PB comes out with something to fill their vases and apothecary jars. This year one of the fillers was over-sized lucky stars.
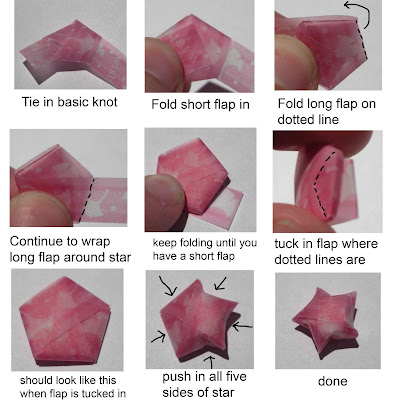
Some of you might remember I wrote a tutorial for basic lucky stars long ago, here. So, I'm resurrecting the tutorial along with an explanation on how to make these music sheet stars. For the most part the process is the same but there are a few adjustments.
Supplies:
Music sheets - search online to find holiday carols and print on light brown paper. Position your sheet music so it's formatted in landscape.
Paper trimmer or scissors
Double stick tape
Basic Star Instructions
1. Cut music sheets into (2" x 11") strips. Make four strips. Tape together to make one long strip.
2. Fold star (instructions above) up to step seven. Using double stick tape, tape end down to star. Finish with step eight. Done
*I recommend not wrapping the paper too tight. The large stars are a little tricky to puff up and might require a couple tries.
1. Cut music sheets into (1" x 11") strips. Make two strips. Tape together to make one long strip.
2. Fold star (instructions above) up to step seven. Using double stick tape, tape end down to star. Finish with step eight. Done
 Other option - use wrapping paper to make the stars. You will be able to make them just about any size that you want, due to the width and length of the paper.


I saw that in the catalog, too! Love them. But I couldn't figure out where to find antiqued sheet music. Light brown paper?? You're a genius!!
ReplyDeleteOh, and I made a lucky star tree topper once. It was probably 8 inches across. Hard to puff up, like you said, but so cool!
I thought the same thing when I saw then in the store! Thanks for the tutorial.
ReplyDeleteThat is such a fun idea!
ReplyDeleteOh, just beautiful! Print your own music sheets is such a great idea, and I lurve the stars. Thanks for the re-tute!
ReplyDeletemy bestfriend got tired teaching me how to do this..I can do it but not as good as her and I wanted it perfect! My hands are moist so as my fingers so it sticks and gets soiled. perhaps a waterproof material can be good for me =P
ReplyDeletePut baby powder on your hands before starting. Yiu hands will stay dry loner and the oils will not get on the paper. Keep some wet wipes handy if you need to clen the powder off and reapply.
Deletethese are gorgeous
ReplyDeleteso going to try this. I'll make a blog post if i'm successful.
ReplyDeletegreat idea! I can make big star as gift/ room deco.
ReplyDeleteThese big stars are such a super great idea! They're so elegant!
ReplyDeleteI was just at the Ole P.B. on Friday and I told my daughter in law the minute I saw these that I was sure I had seen a tutorial on these on a blog somewhere...Thanks for reminding us! Love your blog,thanks so much for re-posting this!-Rebecca
ReplyDeleteTheses stars are so addictive! I made some a while back, I used scrap paper for the inside (to add stiffness) and wrapped them with shiny ribbon on the outside (to save on ribbon.) Then I string them through using a needle and thread, and beads as spacers to make starry garlands for the tree.
ReplyDeleteAnother idea: I saw a big star made of transparent material filled with bright colored smaller stars... too advanced for me!
Thanks for the tuto, I will try to make that!
ReplyDeleteAnyone else stuck on the "wrap around the star" step? Several of us have tried a million times and can't figure it out. Do you wrap and turn around each side? How do you keep the "dotted line" slot open? Wish there was a video but thanks anyway!
ReplyDeleteTo the anonymous commenter,
ReplyDeleteSorry you're having trouble with them. Have you tried making them with smaller paper first? It might be hard to learn how to make them starting off with the large size paper. I recommend looking at the first lucky star post.
Here's a video on YouTube that might help as well.
http://www.youtube.com/watch?v=xOAdh-sQyq4
These stars are soo cute -thanks for sharing! Eva
ReplyDeleteThank you for these big stars :-)
ReplyDeleteHeidy
Great idea! Do you think it would be okay to modpodge the larger stars so that they would be more durable and perhaps have a sheen to them? Just wondering. ~Elizabeth
ReplyDeleteHow beautiful! I have to try these.
ReplyDeleteGeorgia :)
In our middle school last year, my friends dragged me along to library during lunch one day to someone from a country in aisa presenting on her country. We made these at the end of the presentation, but I never got the instructions, so I was so lucky to stumble across this, thanks!
ReplyDeletetfs your tutorial!!!
ReplyDelete