Home About Press Crafts Recipes
Showing posts with label recipes. Show all posts

Monday, September 16, 2013

Gummy Fun

Not too long ago I picked up the book Gummy Fun at Kinokuniya in San Jose. I've always wanted to try making my own gummy candy and this book looked like it had some good and unique recipes to help me get started.   I also liked the cute pictures in the book (I'm a sucker for cute pictures).  Below are a few photos of the inside of Gummy Fun.

Demonstrates how to make depression molds.

Cute illustrations I was talking about.

Coffee and milk tea gummies.  Yes, please.

Here's a photo of one of the recipes I  tested out.  I made my gummy candy with canned peaches.

For the gummies, I used a silicone heart mold I found at Daiso for $1.50.  One batch ended up filling up the heart molds perfectly.  I should also point out the recipes make tiny batches.  The gummy hearts don't taste like the gummies you would find in the candy aisle.  They're less sweet and the texture is more like thick jello. 

Overall I like the book.  My only complaints are that it never states how long it takes to make the gummies.  The directions only say to "set up at room temperature". The gummy hearts I made took an hour to set up.  There's also no mention of how long the gummy treats will stay fresh or if they need to be refrigerated.  But knowing my family, that's not really a problem.  I'll be lucky if the gummy hearts last an hour in our house.

Have you ever made your own gummy treats?  Have any good recipes to share?

Tuesday, April 9, 2013

Eye Candy

and then there were two...

A while back I bought some candy eyes at the store.  I had planned on using them for April Fool's day for my kids' lunches.  I had it all planed out, I was going to place the eyes in their sandwiches and not say a word.  Unfortunately the joke was on me because April Fool's Day fell on spring break.  I suppose I could have used them anyways but it just didn't seem as fun.  I guess there's always next year.  That said, I thought some of you might enjoy seeing the eyes in action.  

Here's what the package looks like.  I purchased the candy at Target but I think I've seen this at Michaels as well. 


I can't help but think of Heidi Kenney's plush toys when I look at this.

Changing subjects, I'm going to try and get rid of the Captcha to make commenting easier.  I stress the word try because I always get tons of spam when I do this.  Then I end up turning the feature back on. If you have the time, please let me know in the comments if you prefer no Captcha, thanks :)

*Update  Captcha is back on.  I had over 30 spam comments within less than 24 hrs :(

Wednesday, December 19, 2012

Recipe: Spicy Chocolate Ginger Guys

Baking gadgets just keep getting better and better.  Last week I was at World Market and discovered a cookie cutter designed to make a cookie that hangs off a cup.  Clever right?  Well for $1.29, I couldn't pass it up.   Of course, I had to test it out right away to make sure it actually worked.  It had nothing to do with eating lots and lots of cookies.

And it just so happened that I also had a new recipe to test out, Spicy Chocolate Ginger Guys.  It was sent to me by Andrews McMeel Publishing to promote one of their newest cook books, The Daily Cookie by Anna Ginsberg.  I liked the recipe so much, I asked Andrews McMeel Publishing if I could share the recipe with all of you and they were kind to say yes. Recipe below.

Spicy Chocolate Ginger Guys
The Daily Cookie: 365 Tempting Treats for the Sweetest Year of Your Life

1 teaspoon baking soda
1/4 cup hot coffee
8 tablespoons (4 ounces) unsalted butter
1/2 cup granulated sugar
1/2 teaspoon salt
1 large egg
1 cup mild molasses
1 teaspoon vanilla extract
1/2 cup unsweetened natural cocoa powder
1 teaspoon ground ginger
1 teaspoon ground cinnamon
1/4 teaspoon ground cloves
1/4 teaspoon freshly grated nutmeg
3 3/4 cupps all -purpose flour

1.  Preheat the oven to 350 F and place a rack in the center.  Line two baking sheets with nonstick foil or parchment paper. 

2.  Dissolve the baking soda in the coffee and set aside.

3.  In the bowl of a stand mixer fitted with a paddle attachment, or in a large mixing bowl, using a handheld electric mixer, beat the butter and sugar on medium speed until creamy.  Beat in the salt, egg, molasses, and vanilla.  Add the cocoa powder, ginger, cinnamon, cloves, and nutmeg and stir until mixed.  By hand or using the lowest speed of the mixer, stir in the flour alternately with the coffee mixture.

4.  Roll out the dough about 3/8 inch thick on a floured surface.  Cut out gingerbread men and arrange them 2 inches apart on the prepared baking sheets.  Bake for 8 to 10 minutes, or until the guys appear set.  Transfer to a wire rack and let cool completely. 

* I refrigerated the cookie dough before I made it.  The recipe does not state to do this but my dough was a little soft.  It's possible I mixed it a little too long. 

This cookie is slightly sweet, as you might have guessed since it only calls for 1/2 cup of sugar.  This cookie would be perfect for a Christmas tea.  It also goes well with eggnog (pictured above).

Sunday, September 23, 2012

JELL-O Jack O' Lanterns

Just for fun I decided to whip up some pint size JELL-O jack o lanterns. It's hard to tell from the photo but this mini jack o' lantern is filled with jello.  What keeps the jello from spilling out is making it into a thicker texture.  It may look complicated but these mini jack o' lanterns are easy to make.  Directions below.

JELL-O Jack O' Lantern Recipe
Makes about 15 jack o' lanterns

Ingredients

2 3oz boxes of Lemon JELL-O
2 Cups Water
15 Clementines
Candied Ginger or Chocolate chips

1.  Slice top of clementine off.

2.  Run tip of spoon between edge of rind and fruit.  Slowly pry the fruit out while keeping the rind in tact.  This is surprisingly easy to do and took me about 30 seconds per clementine.  Save the fruit for a snack or serve with jack o' lanterns.

3.  If you have a hole at the bottom of your rind, you will need to plug it with a piece of candied ginger or chocolate chip point size down.  Make sure it will not float to the top when you pour your jello into the rind.

  4.  Boil 2 cups of water.  Add both packets of jello.  Mix till dissolved. 

Before pouring your jello, I recommend placing all the rind cups in a muffin tin with the top beside each cup (pictured above).  This way all your tops will match up.

5.  Pour jello to the top of clementine cup.  Place in fridge.  Let jello set up.  It took about three hours for the jello to set up.


6.  Carve out a face with a pairing knife.  Place top back on.

I discovered if you place a flashlight behind the clementine they light up just like a jack o' lantern.  This might be a fun way to serve or display the jello. 


Tuesday, June 26, 2012

Child Twin Chefs

Have you heard of the twin chefs Lilly and Audrey Andrews?  I only recently learned about them after my mother gave us this signed copy of Sonoma Magazine. Lilly and Audrey are ten year old twins who love to cook.  Their goal is to become the youngest children to attend cullinary school.  They've made appearances on Good Morning America and Ellen.  I found their story inspiring and charming.  The article is a good read but if you can't get a copy of the magazine, you can find out more about the twins on their website, Twin Chefs. 

As a mother of two, reading the article made me reflect on how I encourage my children to cook in the kitchen.  My children aren't preparing foie gras appetizers but they like to make pancakes (with supervision).  I've found they also appreciate a meal more when they have a hand in making it.

Do you let your children cook with you?  On their own?  What are their favorite things to make?

Thursday, May 31, 2012

Recipe Round-up

Even though I haven't posted any recipes in awhile, I've actually been cooking/baking quite a bit. Lately its been all about trying out new recipes.  So today I thought I would share a few that have been popular around here.

Tuscan Lemon Muffins - What makes these muffins unique is that they're made with olive oil and ricotta cheese.  They're moist and not overly sweet.  Next time I make them, I want to try adding a little rosemary.  (Tuscan Muffin pictured above)

Green Smoothie Cups - The beauty of these smoothie cups is that you make them in portion size and store them in the freezer.  When you're ready to make your smoothie, all you need to do is blend two of the frozen cups plus coconut water.  These are perfect for summer.  I recommend making a couple batches at a time if you like them.  There's a lot of prep so it's easier to do it all at once.

Rhubarb Yogurt Cake - This cake is easy to make and isn't overly sweet.  This would be perfect to make for a brunch.  My children didn't care for the rhubarb (thought it was too tart).  So if you plan on serving it to children, you might want to replace the rhubarb with blueberries or strawberries.

Slow Cooker Pulled Pork - Recipes don't get much easier than this (only four ingredients).   We like to make sliders with the pulled pork and eat it with Kings Hawaiian bread.  

Try any new recipes lately?  Have any good ones to share?

Wednesday, December 14, 2011

Peppermint Candy Shaped Cookies

These peppermint candy shaped cookies were inspired by the popular lollipop cookies. I actually had the idea of making these cookies for over a year now but just recently was able to test it out. I'm not sure why it took me so long but here they are, peppermint candy shaped cookies! Below you'll find the recipe, instructions and tips to make your own.

Why this recipe? Can't you use any sugar cookie recipe?
Well after experimenting with different recipes my answer is no. I found some recipes will not hold the shape of the cookie. They usually just flattened out and didn't give the definition that makes these cookies unique. I'm sure other recipes will work but I found this one works the best.

*Cookies are not peppermint flavored.

Cookie Dough Recipe
via allrecipes
makes 2 dozen
Ingredients
3/4 cup butter, softened
3 oz of cream cheese, softened
1 cup white sugar
1 egg
1 teaspoon vanilla extract
2 3/4 cup all-purpose flour
1 tsp baking powder
1/4 tsp salt
red food coloring

1. In a bowl cream butter, cream cheese and sugar until fluffy. Add egg and vanilla and blend until smooth.

2. In another bowl add flour, baking powder and salt.

3. Add dry ingredients to wet ingredients and mix until dough forms.

4. Separate into two balls. Add food coloring to one dough ball. If you can, use a high grade food coloring that will give you a rich color. Adding too much coloring can make your dough bitter.

5. Refrigerate dough for two hours.

Take about a two teaspoons of the white dough and two teaspoons of the red dough and form into logs. Twist both pieces together.

Roll and twist dough until it measures 12 inches along. Roll into cookie shape. Optional - sprinkle with sanding sugar. Place cookies 3 inches apart on a lightly greased baking sheet. Bake at 35o for about 7 to 8 minutes.

* I've found that a nonstick aluminum rim cookie sheet holds the shape of the cookies better but the bottom will brown quicker.

*With an insulated tray, cookies will flatten out a little more but will brown less on the bottom and cook evenly.

Your cookies should look something like this when done. I baked these cookies on an insulated tray.

Wrap them in cellophane to make them look like giant peppermint candies. Use them for favors, tree decorations, or whatever else you can think of.

Thursday, July 28, 2011

Recipe: Quinoa Tabbouleh

Recently I received a comment on the Lego party post that read,"omg these dishes look super tasty.. I d love to know the recipes :) Jean ". Thanks for asking Jean, here's one of the recipes from the party, Quinoa Tabbouleh. It's a fresh tasting healthy dish that's great for summer. It can also be made the day before. The other dishes I had made for the party were Shell Pasta Salad and Sweet Potato P0blano Salad. The main dish was sandwiches from our local deli.

Quinoa Tabbouleh Recipe
(recipe from Auntie Susan)
Ingredients:
2 Cups water
1 Cup uncooked quinoa
1 pinch salt
1/4 cup olive oil
1/2 tsp. sea salt
1/4 cup fresh squeezed lemon juice (if using bottled lemon juice start with 2T and add to taste)
3 tomatoes, diced
1 cucumber, diced
2 bunches green onions, diced
2 carrots grated
1 cup fresh parsley, chopped

1. In a saucepan bring water to boil. Add quinoa and a pinch of salt. Reduce heat to low, cover and simmer for 15 minutes. Allow to cool to room temperature; fluff with a fork.

2. Meanwhile, in a large bowl, combine rest of ingredients and stir in cooled quinoa. Enjoy.

Thursday, June 2, 2011

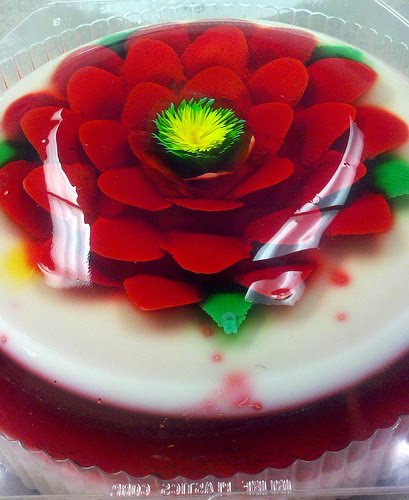
Flowers Made of Jello

Photo from bearexposed on Flickr

Have you ever heard of Gelatina Encapsulada (gelatin capsule) before? I just learned about them and I'm completely enthralled. The other day my aunt was telling me about a friend of hers who took a class on how to make the jello flowers. So as soon as I got home, I did a quick online search to see what they were all about. Once I saw the flowers I knew I had to share them with all of you. They're simply amazing.

The flowers are made by slicing the jello and injecting jello where the slice was made. Here's a video that demonstrates the technique.


I think I found something worthy of the bucket list; learn how to make these jello flowers!

Wednesday, May 25, 2011

Koi Fish Jelly Roll Cake

Why didn't I see these a few weeks ago for Boy's Day?! They would have been the perfect thing to make for the holiday. Oh well, at least I'll be prepared for next year.

Want to make some of your own cute koi fish jelly roll cakes? Stop by Junko's site for the decorating how-to (recipe not included). The site is in Japanese so here's the translated version if you need it. Besides this koi fish cake, you'll find instructions for other jelly roll cakes. Happy Baking!

Update: Jelly Roll Recipe
I just noticed the translated version isn't showing all the pictures. Not sure why that's happening. Click on the untranslated version "Junko's site" for the step by step pictures.

Tuesday, April 19, 2011

Easter Basket Breakfast

During spring break I try to make it fun and do some special things for the kids. It's always simple things, nothing over the top. One thing I like to do is spend a little more time on breakfast. Since I'm not rushing them off to school, I have a little more time to prepare a morning meal. In this case, I made them this Easter basket breakfast. Even though it's very colorful it's actually relatively healthy. Do you recognize the colorful ingredient? That's right, I used boba to garnish the top to look like candy. Normally you find them in milk tea drinks.

uncooked boba
Ingredients:
Greek yogurt - individual container
One Sliced Kiwi
Rainbow boba - also know as tapioca balls or pearls. Colorful cereal or dried fruit could be used in replace of the boba.

Here's what the boba look like once they're boiled. The package should say how to prepare them. Usually you just have to boil them for about 5 - 10 minutes depending on size.

1. If you can, cut off the label on the yogurt or cover with a pretty paper. Tie bow around the top edge. Use a little double stick tape to hold in place. Peel off lid.

2. Place sliced kiwi along the edges to look like grass. Lay kiwi flat on top of the rest of the yogurt.

3. Place boba or cereal on top. Done.

Thursday, April 7, 2011

Recipe: Chai Oatmeal Raisin Cookies

Lately I've been on a chai tea kick. It all started with an impulse buy at Costco. I purchased three cartons of chai condensed tea and have been drinking it everyday. I'm pretty sure I've gained some weight in the process as well. Impulse buys are rarely a good thing. However, one good thing came out of it; I was inspired to create a chai oatmeal raisin cookie recipe.

Chai Oatmeal Raisin Cookie Recipe

Ingredients:
3 Cup Oats
2 Cup Flour
1 1/2 tsp Cardamom
1 tsp Cinnamon
1 tsp Ginger - for less spicy cookies use 1/2 tsp
1 tsp Cloves - for less spicy cookies use 1/2 tsp
1 tsp Baking Soda
10 Grinds of pepper ( about 1/4 - 1/2 teaspoon)
4 Tea bags of black tea
1 Cup of butter (2 sticks of butter)
1 Cup packed brown sugar
1 Cup sugar
2 Eggs
1 1/2 tsp vanilla
1 cup raisins

1. Heat oven to 350 F
2. Beat together butter an sugars.
3. Add eggs and vanilla.
4. In a separate bowl mix all other ingredients except oats and raisins.
5. Add dry ingredients to butter/sugar mixture.
6. Mix in oats and raisins.
7. Drop rounded tablespoonfuls of dough onto an ungreased cookie sheet.
7. Bake 10 - 12 minutes until golden brown.

Makes about 4 dozen.


Thursday, March 17, 2011

Recipe: Shamrock Chips

I always like to prepare a snack for the kids when they get home from school and for the holidays I like to make something extra special. So in honor of St. Patrick's Day, I came up with these shamrock chips. The chips are quick and easy to make, perfect for St. Patty's parties.

Shamrock Chip Recipe

Ingredients:
Cooking Spray
Salt for taste
Spinach tortilla wraps

With shamrock cookie cutter, cut out as many shamrocks as possible from tortillas. I was able to get about 7 shamrocks per tortilla.

*Sometimes the cookie cutter will not cut all the way through the tortilla. To get a better cut, push the cookie cutter down firmly and move the entire tortilla back and forth while pressing. For those stubborn edges that will not cut, use cooking scissors.

*Save scraps to sprinkle on soups and salads.

Place on baking sheet. Spray shamrocks with cooking oil. Sprinkle with salt. Bake at 375 degrees for about 7 - 10 minutes. Check often, they burn quickly.

Serve with your favorite dip.

Happy St. Patrick's Day everyone!

Tuesday, March 15, 2011

Recipe: Cocoa Mochi Cake

I had planned on sharing a snack idea for St. Patrick's Day but the weather was just not cooperating for pictures. I really need to invest in a photo light box. Fortunately, I had taken pictures a while back of this cocoa mochi cake I made so I'm sharing this recipe instead. The recipe comes from a friend who is an exceptional baker. Her recipes never disappoint. If you're looking for something different for dessert, this just might be the recipe for you. Enjoy!

Cocoa Mochi Cake Recipe

Ingredients:
1 lb Box of mochiko (rice flour)
1 T Baking soda
3 T Cocoa powder
1 3/4 Cup white sugar
1/4 Cup melted butter (1/2 cube)
2 Beaten eggs
12oz Can evaporated milk
120z Can coconut milk
1 tsp Vanilla

Preheat oven to 350 degrees

Grease 9" x 13" pan

1. Mix mochiko, sugar, cocoa, and baking soda.

2. Add all the liquids, mix well until batter is smooth.

3. Bake 1 hour and 10 minutes.

4. Cool completely and cut with a plastic knife.

*A regular knife will stick to the cake; that's why it's good to use a plastic knife.


Tuesday, March 1, 2011

Recipe: Cinnamon & Sugar Pretzel Bites

On the rare occasion that I take the kids to the mall, one snack we like to indulge in are the baked pretzels. My son particularly likes the cinnamon and sugar pretzel bites and with good reason. They're dough balls covered in sugar, what's not to like? Well, after spending way too much money on those pretzels, I decided to try making my own. Directions below.

Cinnamon & Sugar Pretzel Bites

1 package of active dry yeast
2 T sugar
1 tsp salt
1 1/2 cup warm water
3 cups all-purpose flour
1 cup bread flour

4 T melted butter
5 T sugar mixed with 1 tsp cinnamon

Directions

1. In mixing bowl add dry yeast, water, and sugar. Let sit for ten minutes.

2. Mix in flour and knead for about 8 minutes. I like to use my KitchenAid for this part.

3. Grease bowl and place dough back in bowl. Let rise for one hour.

4. Separate dough into about 10 - 12 pieces. Roll into long ropes about 1/3 inch thick. Cut into 1 1/2 inch length pieces.

5. Place on a parchment paper covered cookie sheet and let rise for 20 minutes.

6. Bake at 450 degrees for about 8 minutes. Time my vary depending on oven.

7. Place on cooling rack and brush with melted butter or dip in butter. Cover pretzel bites with cinnamon and sugar mixture. Serve warm.

Makes about 10 servings.


What's your favorite mall food snack?

Wednesday, December 22, 2010

Easy Butter Mints

As promised, here's what we made for the Sunday school teachers, butter mints! The kids made most of the mints. They had a lot of fun picking out the mint shapes which was probably their favorite part. Well, that and eating the candy.

We used our old advent calendars as the candy molds.

We used Cindy's butter mint recipe on Skip To My Lou. I did have to double the powdered sugar to get it to a dough like consistency.

I found these adorable printable gift tags over at Orange You Lucky! by Helen Dardik. I erased the "to & from" part and added my own message. I also printed them on sticker paper to make it easier to attach the tags to the containers. And of course, I snuck in a little Japanese masking tape in the wrapping. I don't know why, but I can't get enough of that tape. Sometimes I wonder how I ever lived without it!

Thursday, December 2, 2010

Recipe: Persimmon Bars

The last of our persimmons were over ripe so I knew I had to do something with them quick. Then I remembered I had a great recipe from a friend that I've been wanting to try. And as luck would have it, I had all the ingredients it required, even the dates! Love when that happens. So I whipped up a batch and they're just as good as when my friend makes them. Well, maybe hers are a little better. But, doesn't everything taste better when you don't have to make it yourself? Recipe below.

Persimmon Bars

Lemon Glaze: Mix 1 cup powdered sugar with 1 - 2 T lemon juice. Add a little juice at a time to get desired consistency. Add a little lemon extract also for taste.

Ingredients:
1/2 cup butter
1 cup sugar
2 eggs
1 cup persimmon pulp
1tsp baking soda
2 cups sifted flour
1 tsp cinnamon
1/2 tsp nutmeg
1/4 tsp ground cloves
1/4 tsp salt
1 tsp grated lemon rind
1 cup chopped dates or raisins (or 1/2 cup of each)
4 T or rum or brandy
1 cup chopped nuts ( I used pecans)


1. Soak raisins and dates in rum and set aside.

2. Cream butter, beat in sugar. Add eggs one at a time beating well after each egg. Add persimmon pulp and lemon rind.

3. Mix flour, baking soda and spices in a separate bowl. Add to wet ingredients and mix.

4. Mix in raisins, dates and nuts. Include any brandy the raisins didn't soak up.

4. Spread onto a greased jelly roll pan. Bake at 350 degrees for 20 minutes. May take less then 20 minutes depending on oven.

5. Let Cool. Drizzle with Glaze. Cut into squares and enjoy!

Monday, November 29, 2010

Hot Cocoa with Marshmallow Snowmen

Here's an instant way to make hot cocoa a little extra special for the holidays, just add a candy marshmallow. You can find these kinds of marshmallows in the candy aisle at most stores. They're relatively inexpensive and come in all kinds of holiday shapes.

Thumpetty thump thump,
Look at Frosty go.
Thumpetty thump thump,
Over hot cocoa.
Zakka Life has moved to a new site!

Click here to visit the new site.