 Here's an instant way to make hot cocoa a little extra special for the holidays, just add a candy marshmallow. You can find these kinds of marshmallows in the candy aisle at most stores. They're relatively inexpensive and come in all kinds of holiday shapes.
 Monday, November 29, 2010
Hot Cocoa with Marshmallow Snowmen
 Here's an instant way to make hot cocoa a little extra special for the holidays, just add a candy marshmallow. You can find these kinds of marshmallows in the candy aisle at most stores. They're relatively inexpensive and come in all kinds of holiday shapes.
 Saturday, November 27, 2010
Let The Christmas Traditions Begin!
 Now that Thanksgiving is over I'm getting everything prepared for Christmas. As I've shared before, I like to put the tree up the day after Thanksgiving. I know that might sound a little rushed but Christmas is one of my favorite times of the year. I used to spend my holiday breaks with my Grandmother and everything about that time was wonderful. We would go shopping, out to eat, and to the movies. Her house would be filled with all kinds of treats, pies, cookies, candy, etc. And the best part, I pretty much could eat anything I wanted when I wanted. So it's with those memories that I want to make the holidays special for my children.
One tradition I started about five years ago was setting aside Christmas ornaments for both my kids. Each child has a box with there own special ornaments. Some are my childhood ornaments, some are gifts, some I made and some they picked out. Each year I let the children pick one new ornament after Christmas. This provides a history of what they were interested in each year. For example, my daughter has a lot of princess ornaments and my son has quite a few Star Wars ornaments. Each year they're excited to see there box of ornaments. They always forget what's inside the boxes so it's kind of like a pre-Christmas for them. Since they're so distracted by the ornaments, I'm able to set up the tree without being interrupted. It's one of the best traditions I've ever started.
Have any of you started Christmas ornament boxes for your kids? I know it's not an uncommon tradition.
Want to read more about family traditions? Please visit here, to see a special family holiday recipe. Plus, read what others are making for the holidays. Clara shared that her family makes chicken soup with abalone!
Wednesday, November 24, 2010
Craft: Music Sheet Stars
 I was looking through the new Pottery Barn (PB) catalog when I stumbled upon something that looked very familiar, paper stars. And they weren't just any paper stars but over sized lucky stars. Did anyone else catch that? Every year PB comes out with something to fill their vases and apothecary jars. This year one of the fillers was over-sized lucky stars.
Some of you might remember I wrote a tutorial for basic lucky stars long ago, here. So, I'm resurrecting the tutorial along with an explanation on how to make these music sheet stars. For the most part the process is the same but there are a few adjustments.
Supplies:
Music sheets - search online to find holiday carols and print on light brown paper. Position your sheet music so it's formatted in landscape.
Paper trimmer or scissors
Double stick tape
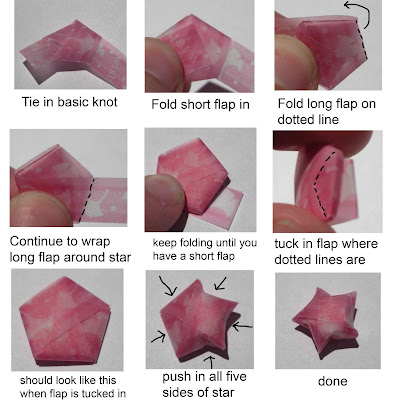
Basic Star Instructions
1. Cut music sheets into (2" x 11") strips. Make four strips. Tape together to make one long strip.
2. Fold star (instructions above) up to step seven. Using double stick tape, tape end down to star. Finish with step eight. Done
*I recommend not wrapping the paper too tight. The large stars are a little tricky to puff up and might require a couple tries.
1. Cut music sheets into (1" x 11") strips. Make two strips. Tape together to make one long strip.
2. Fold star (instructions above) up to step seven. Using double stick tape, tape end down to star. Finish with step eight. Done
 Other option - use wrapping paper to make the stars. You will be able to make them just about any size that you want, due to the width and length of the paper.
Sunday, November 21, 2010
'Tis The Season of The E-zine
Lately, it seems every where I look I'm spotting online magazines. And not just any online magazines but gorgeous, creative, awe-inspiring, craft, design and entertaining magazines. There's enough creativity flying around to keep it snowing glitter until the end of the year!
 New to the E-zine scene is Kireei magazine. The magazine emerged from the site Kireei which focuses on design and products in the following categories; home, children, eco, kitchen, and photography (many of which are handmade). In this first issue of Kireei magazine you'll find interviews, child book reviews, tutorials, and much more.
Inspired Ideas is the brain child of the talented Amy Powers. Amy is the author or the blog Inspire co. Inspired Ideas is just what you would except from the title, a magazine packed with inspiring crafts. If I counted correctly, there's 31 projects in this issue alone!
Just like the blog Sweet Paul, the magazine stands out for its exceptional photography and styling. The first word that comes to mind when I see this magazine is "sophistication". You'll find high style products, recipes and tutorials in this issue.
I hope you'll get a chance to look at some of these e-zines. I can't help but feel inspired after looking at them, myself. These E-zines make me want to blog better, craft better, and most importantly live better.
Wednesday, November 17, 2010
Upcycle Craft: Christmas Bows
 One of my favorite things to do during the holidays is wrap gifts, weird right? While most people dread it and find it to be an inconvenience, I find it relaxing. Part of the fun is picking out the paper, decorations, ribbon and creating a theme (yep, I usually have a gift wrap theme). Somethings I make and some things I buy.
 This year I stumbled upon a way to make a bow after finishing off a bag of candy. I was inspired by the actual candy bag, the inside foil reminded me of Christmas Bows. So, that's what I set out to make. The result, a surprisingly quick and easy way to make a bow. I didn't time myself but I'm sure it took no longer than two minutes to make. Here's the how-to.
Supplies:
Food packaging lined with foil - For this craft the package should be constructed with two sheets sealed on all four sides.
Double stick tape - I used tape that's pre-cut for scrapbooking.
Scissors
*Click on pictures to get a larger view.
 Starting with a food package, cut strips horizontally. Next, turn all the strips inside out.
 The strips naturally coiled into a figure 8 shape. The left "8" I taped the center together to make two loops. The right "8" has not been taped, it's just to show you how the strips naturally form. Next, take one loop and push it down in the center to make a bow shape and tape (refer to right picture).
 Now push down the other loop just like you did in the last step and tape. Make three of these and one basic loop (refer to right picture).
 Take two of the bows you made and tape them together in an "x" shape. Next tape another bow vertically down the center of the bows.
 Last, tape your basic loop in the center. Done.
Kid Christmas Crafts
 Photos via: top left-Pretty Ditty, top right-Make & Takes, bottom left-Maya Made, bottom right-The Red Thread
iVillage has a great round-up of kid Christmas crafts on their site today. You'll find my twinkle pom-pom ornament included in the tutorials. Above are just a few of the other crafts featured.
If there's one thing I've learned, it's that you can never start planning too early for Christmas. You might want to tuck some of these ideas away for later use when the kids are on winter break. You'll be glad you planned ahead when you start getting the "I'm board" complaints.
Looking for more Christmas ideas? Check out the Christmas section under craft projects in the right side bar. Over here, I'm sharing about holiday food family traditions. Please stop by and join the conversation.
Monday, November 15, 2010
Craft: Google Map Place Cards
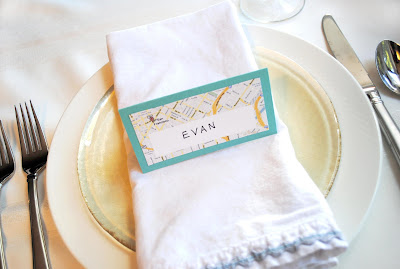
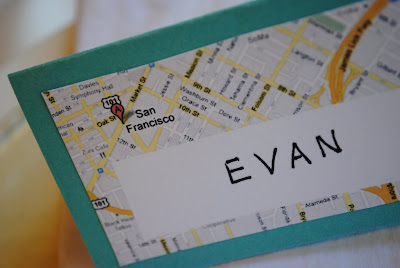
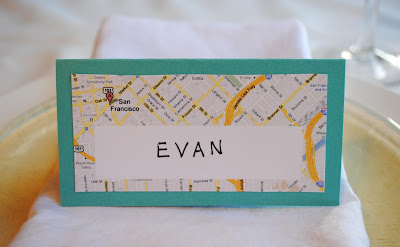 Let your guests know exactly where they're sitting with these cute Google map place cards. These place cards are quick, easy and inexpensive to make. In fact, you probably have everything you need to make these at home. Here's the how-to.
Supplies:
White card stock
Card stock in color of your choice
Scissors
Glue stick
 Go to google maps. Enter the desired address in the "search maps" box. Zoom in or out according to how you want your map to look. To copy the map hold down keys Ctrl, Alt, Print Screen" all at once. Paste into a photo editing program such as Photoshop.
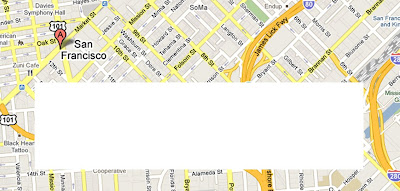 Crop to desired size. Add a white rectangle on top for the name. Copy entire image and fit as many place cards as you can on your 8 1/2" x 11" page. Print on white card stock. Cut out.
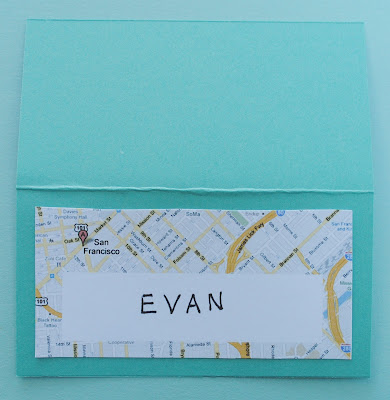 Glue down Google map on a second piece of card stock (refer to picture). Fold in half.
Sunday, November 14, 2010
New Giveaway: Ecosystem Journals
 Have you checked out the giveaway page lately? I've got a new giveaway up for these Ecosystem Journals and there will be three winners! Click here for details.
Friday, November 12, 2010
Knit Cloche Hat Pattern Update
 A lot of you have been asking for the pattern for this knit cloche hat and I just wanted to let you know it's now on the site, here. Sorry it took me so long to get it back on the site. Enjoy.
Coffee Punch Recipe
Wednesday, November 10, 2010
Eyeglasses are The New Mustache
 Have you noticed how the mustache trend is slowly fading away while the black rimmed eyeglass is just waiting to take its place? Soon there will be eyeglass everything: plushies with eyeglasses, plush eyeglasses for babies, eyeglass rings (draw your own face on finger to complete), hats with faux eyeglasses knit into them, eyeglass parties, eyeglass invitations, and most inevitably eyeglasses on a stick. So, to celebrate this eyeglass trend I thought I would make a stamp. My inspiration came from my sweater in the picture above. Below are brief instructions on how to make an eyeglass stamp.
 I specifically created this image for the stamp. You're welcome to use it for personal use. Right click, copy, save, and print. Feel free to make the image any size you want. I made my stamp about 3 1/2" length.
Supplies:
Template
Tracing paper
Linoleum Cutter
Speedy Stamp
Pencil
Flat block of Wood - I like to use the left over wood blocks from kamaboko.
Strong glue
1. Trace template with tracing paper.
2. Transfer image from tracing paper onto speedy stamp.
3. Cut away all negative space with linoleum cutter.
4. Cover with ink and stamp to see what you need to touch up.
5. Once your stamp is how you like, stamp top of wood and glue stamp onto block of wood.
Sunday, November 7, 2010
Favorite Fall Recipes
 Today I tested out this pumpkin scone recipe I found online (it was a hit with the family). With so many recipes out there, I always find it hard on choosing the right one. Especially when I don't know how they're going to turn out. So, today I thought I would share a few recipes that I've found online that I consider keepers. Enjoy.
Acorn Stuffed Squash with Quinoa on Craft: Made this last Thursday.
Chicken Tortilla Soup on The Larissa Monologues: This is a family favorite. I set out tomatoes, avocados, cilantro, cheese, tortilla chips, and sour cream in separate bowls. Then everyone just chooses what they want in their soup.
Pumpkin Pasta on Mom Advice: Just made this last Friday for dinner. It's my son's favorite.
Pumpkin Scones on Food.com: Made these today, picture above. I like to make scones smaller so they go farther. I usually pair them with fruit and yogurt to make a complete breakfast.
Super Sloppy Joes on Food Network: I like to sneak other vegetables into these like broccoli and carrots.
Veggie chili on La Fuji Mama. Will even satisfy your meat and potato eaters. Usually there's enough leftover for me to freeze and save for another dinner.
Got a favorite fall recipe? Feel free to share in the comments along with a link.
Friday, November 5, 2010
The Hairstlye Dilemma
 It seems like once a year I go through this phase where I can't stand my hair anymore and have to do something drastic with it. Anyone else get like that? This time I opted for the Katie Holmes bob and chopped off about 7 inches. The bangs were a little different for me but not entirely new. In junior high I once rocked the 90210 Brenda haircut which I thought looked good at the time. However, now that I'm looking at this picture, I'm not so sure (picture below).
 So, now it's been two weeks and I'm still not sure what to do with this hairstyle. What do you guys think, keep it, grow it out, ditch the bangs?
P.S. Aren't you glad you stopped by today to read this riveting post *sarcasm*.
Wednesday, November 3, 2010
Holiday Traditions
 Today you can find me over on my giveaway/review page sharing about a special holiday tradition along with the recipe for Grace Episcopal Coffee Punch. Hope you'll stop by and check out A Cup of Tradition.
Monday, November 1, 2010
How To Make a Japanese Money Envelope
 This Japanese money envelope is also known as kinpu. Often money is given for special occasions and presented in one of these beautiful folded envelopes. These envelopes come in many styles, some more elaborate than others. For this tutorial, I thought I would share a very basic style with you.
Supplies:
Mizuhiki cord - can be substituted for ribbon
12" x 12" green washi paper - scrap-booking paper works just as well
1" x 9" strip of decorative washi paper
7 1/4" x 4" pink paper
Glue Sticks
Acrylic varnish
Tape
Wax paper
Plain white money envelope or money wrapped in tissue
Making the Envelope
 Place money in center of the decorative envelope. Fold in where you have scored the paper starting with the bottom flap first. Fold facing left flap in. Fold facing right flap in.
 Your envelope should now look something like this.
Take three strips of mizuhiki cord and tape down on wax paper. Brush one side with acrylic varnish. Let dry. In the mean time you will make your mizuhiki knot. For directions, click here.
 Wrap decorative washi paper around the envelope and glue in back. Do not glue the washi paper to the envelope. You want it to be able to slide off. Wrap mizuhiki cord around decorative washi paper and tape together to hold in place. Hot glue mizuhiki knot in front. Done.

 Here are a couple elaborate mizuhiki knots from some money envelopes. If you feel like a challenge, you can try and recreate these.
Sorry this post is a little late. Friday night I had to go to the ER due to a tension headache. I'm fine now but I was out of commission for the weekend. I'm just now getting back into my regular schedule.
 Place money in center of the decorative envelope. Fold in where you have scored the paper starting with the bottom flap first. Fold facing left flap in. Fold facing right flap in.
 Your envelope should now look something like this.
Take three strips of mizuhiki cord and tape down on wax paper. Brush one side with acrylic varnish. Let dry. In the mean time you will make your mizuhiki knot. For directions, click here.
 Wrap decorative washi paper around the envelope and glue in back. Do not glue the washi paper to the envelope. You want it to be able to slide off. Wrap mizuhiki cord around decorative washi paper and tape together to hold in place. Hot glue mizuhiki knot in front. Done.
 Here are a couple elaborate mizuhiki knots from some money envelopes. If you feel like a challenge, you can try and recreate these.
Sorry this post is a little late. Friday night I had to go to the ER due to a tension headache. I'm fine now but I was out of commission for the weekend. I'm just now getting back into my regular schedule.
Subscribe to:
Posts (Atom)


