Home About Press Crafts Recipes

Friday, December 30, 2011

Craft: Oversized Sequins Decoration

When I think of New Year's Eve, images of glitter, disco balls, and sparkly dresses come to mind. Playing on that theme, I decided to make some oversized sequins to hang from the ceiling. I also made a few smaller ones to decorate the table. If you're still looking for some last minute ideas, these might be fun to make. They're pretty quick and easy to create too.

Supplies:
Metallic cardstock - I got mine at Paper Source. You could also use wrapping paper. If possible look for double sided metallic paper.
Scissors
Scoring tool - bone folder, popsicle stick, etc.
Ruler
Exacto knife

Cut out a circle (any size you want). If your paper isn't double sided, cut out two circles and glue wrong sides together. Let dry.

Find center of circle and cut a small hole in it using your exacto knife.

Place ruler in the center of the circle, crossing the hole you just made. With scoring tool, make two lines, one at the top and one at the bottom (refer to picture below). Turn ruler to a 60 degree angle from first line and make two more lines. Do this until there are six scoring lines on your circle (refer to picture).


Using the ruler as a guide, score the purple lines in the center of the circle to make a hexagon.

Now you will make creases on all the lines you just scored. Start with all the lines on the outer edge of the circle. Next fold each section up until the circle looks like a sequin. This might take a little finessing to get it just right. Your sequins should look something like the one in the picture above.

Here are some smaller sequins I made to decorate the table.

*Raising my glass*

Here's to the bright New Year
And a fond farewell to the old;
Here's to the things that are yet to come
And to the memories that we hold.

Cheers,

Jessica

Tuesday, December 27, 2011

Printable Camera Calendar

Need a new calendar for the New Year? Here's one of my favorites online, a camera calendar by Cannon Creative Park. The calendar folds down into a flat image of a camera. When the calendar is open, it folds into a square with four different 3D landscapes. It takes about three hours to make. My only complaint with it is that the open/close latches are difficult to use. Here are few pictures of the calendar I made.


Tuesday, December 20, 2011

Free Printable Christmas Gift Tags

Image Credit: Natascha Rosenberg

Have you noticed how many free holiday gift tags are available online lately? I feel like every time I turn the internet corner, BAM, there's another one. And the best part about it is that they're all lovely designs. Here's a list with links to a few of my favorites ( in no particular order).

Little Red Riding Hood (pictured above) - Natascha's Blog

Typographic Gift Tags - Eat Drink Chic

Forrest Themed Gift Tags - Studio Morran

Whimsical Illustrated Gift Tags - Orange You Lucky!

Vintage Christmas Book Illustration Tags - My Girl Thursday

Doodle Holiday Tags - Craftzine

Kawaii Gift Tags - Wild Olive

Feather Gift Tags - Love vs. Design

* Tag tip - print your tags on sticker paper to just peel and attach to packages quickly!

Sunday, December 18, 2011

The Mitsuwa Marketplace

Over the weekend we made a trip out to the Mitsuwa Marketplace for some Japanese groceries. While we were there, we picked up a few last minute gifts for Christmas. Below are a few pictures of what we purchased along with our food adventures.

Currently at most Asian markets you can find specialty wrapped sweets for the holidays. Usually the food is just as pretty as the packaging. If you're looking for a special hostess gift, try out one of these boxes (pictured above). They're pre-wrapped and ready to go. Perfect for your favorite foodie!

We picked up this cute Mameshiba book at the Kinokuniya bookstore. We have another Mameshiba book and it's my daughter's absolute favorite. I also was able to get a couple bean-dog plushies when my kids weren't looking, he he.

Another great find was this children's book by the famous artist, Yoshitomo Nara. I really like it but I have to warn you that some people find Yoshitomo's work creepy. If you think you would like to get this book, check out the artists illustrations first.

Spaghetti Bread

At the shopping center there's a Japanese bakery called Clover Bakery & Cafe. They offer all kinds of unique breads and pastries including, spaghetti bread, unagi (eel) pan, and yakisoba pan just to name a few. My husband tried the yakisoba pan and said it tasted kind of like a Japanese version of a piroshki. I had the melon pan which was delicious. It had just the right crunch on the outside and was perfectly soft and fluffy inside.

Chestnuts roasting on an open chestnut roaster?

I have a confession to make, I've never tried fresh roasted chestnuts up until now. The chestnut booth was outside the store so I decided to give it a try. It just seemed like the Christmasy thing to do. So glad I did too, both my daughter and I enjoyed them on our ride home.

Now I'm curious, what unique places do you like to shop at for the holidays?

Friday, December 16, 2011

How to Make an Upcycled Craft Kit

Can you keep a secret?

You can? Good.

I like to collect trash for my kids to play with!

There are so many unique packaging items that make perfect crafting supplies. We use them all the time in our projects. In fact, we use them so much that I have a special box to keep them in. This got me thinking. . . .what if I made an upcycled craft kit?

These kits would be fun to make as a gifts for play groups. They're also good for rainy days or winter break. Below I share how I put my kit together. There's no wrong or right way to do this, make them however you want and get creative!

Supplies:
Plastic milk jug
Hole punch
Button
Rubber band
Wire
X-ACTO knife

You can skip these steps if you have a container with a large lid.

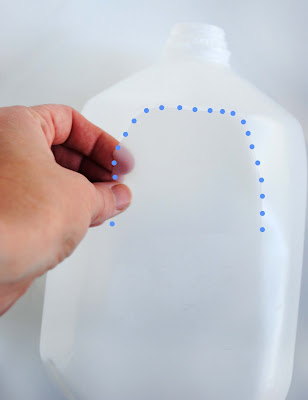
The first thing you will need to do is make an opening to fit the craft supplies in. With an exacto knife cut plastic jug (refer to blue dots in picture).

Punch two holes above the jug's flap and attach a button with wire. I placed a piece of tape over the back of the wire (in inside of jug) to prevent little hands from getting scratched.

Next, punch two holes at top of flap. Cut rubber band into one string. Thread through both holes to make a loop. Tie knots on back of flap. Now you have a larger closure for your container. All you need to do now is fill it with craft supplies!

Above are few things I put into the remake kit: squeeze bottle cap (makes a great hinge), fruit pouch caps (good for wheels), pizza table, plastic spool, mesh bag, and sock packaging.

Along with the recyclable items, I recommend adding some tools and supplies for embellishments. Here's a list of a few ideas.

Tools
Scissors
White Glue
Glue Dots
Markers
Paint Pens

Craft Supplies
Googly eyes
Pom Poms
Rhinestones
Popsicle sticks
Pipe cleaners
Rubber bands
Buttons
Stickers

And if you want, here's a label you can put on your kit. Just click on it, right click, copy, paste and print.

When your kit gets low, just add more trash to it.

Wednesday, December 14, 2011

Peppermint Candy Shaped Cookies

These peppermint candy shaped cookies were inspired by the popular lollipop cookies. I actually had the idea of making these cookies for over a year now but just recently was able to test it out. I'm not sure why it took me so long but here they are, peppermint candy shaped cookies! Below you'll find the recipe, instructions and tips to make your own.

Why this recipe? Can't you use any sugar cookie recipe?
Well after experimenting with different recipes my answer is no. I found some recipes will not hold the shape of the cookie. They usually just flattened out and didn't give the definition that makes these cookies unique. I'm sure other recipes will work but I found this one works the best.

*Cookies are not peppermint flavored.

Cookie Dough Recipe
via allrecipes
makes 2 dozen
Ingredients
3/4 cup butter, softened
3 oz of cream cheese, softened
1 cup white sugar
1 egg
1 teaspoon vanilla extract
2 3/4 cup all-purpose flour
1 tsp baking powder
1/4 tsp salt
red food coloring

1. In a bowl cream butter, cream cheese and sugar until fluffy. Add egg and vanilla and blend until smooth.

2. In another bowl add flour, baking powder and salt.

3. Add dry ingredients to wet ingredients and mix until dough forms.

4. Separate into two balls. Add food coloring to one dough ball. If you can, use a high grade food coloring that will give you a rich color. Adding too much coloring can make your dough bitter.

5. Refrigerate dough for two hours.

Take about a two teaspoons of the white dough and two teaspoons of the red dough and form into logs. Twist both pieces together.

Roll and twist dough until it measures 12 inches along. Roll into cookie shape. Optional - sprinkle with sanding sugar. Place cookies 3 inches apart on a lightly greased baking sheet. Bake at 35o for about 7 to 8 minutes.

* I've found that a nonstick aluminum rim cookie sheet holds the shape of the cookies better but the bottom will brown quicker.

*With an insulated tray, cookies will flatten out a little more but will brown less on the bottom and cook evenly.

Your cookies should look something like this when done. I baked these cookies on an insulated tray.

Wrap them in cellophane to make them look like giant peppermint candies. Use them for favors, tree decorations, or whatever else you can think of.

Sunday, December 11, 2011

Free Printable: Christmas Cootie Catcher

Christmas Cootie Catcher, say that three times fast!

Remembering my own appreciation for these paper toys, I decided to make a Christmas version. I actually can remember my first cootie catcher. In elementary school, someone brought one to school and of course I just had to have one. I remember telling my mom about it and she said she recalled making them. I can remember her trying to figure it out with a piece of paper. I even remember feeling impatient with her that she wasn't making it quick enough. Finally, she figured it out and I had my first cootie catcher. Curiously, I don't remember what was written on it... numbers? colors? jokes? That part is all a blur.

This cootie catcher has already been child tested and approved. When I woke up this morning, I found my children playing with the prototype. It didn't have the jokes printed in it yet but they were still having fun.

Click on image, right click, copy, paste, print. The printed images should be about 7" x 7". You might need to scale the image to make it bigger as well. Click here for directions on how to fold a cootie catcher.


Start playing!

Tell a joke.

Thursday, December 8, 2011

Elmer's Look for Less Giveaway

Yesterday I participated in the Elmer's look for less challenge where I made a faux bronze wall art piece. Today I'm hosting a giveaway with products to help you make your own look for less. Here's what you could win (two winners)!

Black 20 x 30 Foam Board

White 20 x 30 Foam Board

CraftBond All Purpose Glue Stick

CraftBond Repositionable Glue Stick

CraftBond Extra Strength Glue Stick

X-ACTO Designer Series Gripster Knife

Painters Assorted Colors Set (colors may vary from photo)

*Picture frames not included in giveaway.

How to enter: Leave a comment guessing which frame above is the look for less (#1 or #2). Guessing the correct frame will not increase your odds of winning. One entry per household. Please leave an email address so I can contact you if you win. The last day to enter the contest is Saturday, December 17 2011. I'll announce the winners Sunday, December 18 2011 on this post. If I do not hear back from the winner after two weeks, I will choose a new winner. Open to US residents only.

Once you make your guess check out the Elmer's Looks for Less Guide (project 6) to find out what the correct answer is. There are a lot of other great projects made with foam board in the guide. If you have a chance, check out the projects. I think you'll be surprised with some of the projects the Elmer's team came up with.

Contest Closed


For those who were curious the look for less was frame #1 !

Wednesday, December 7, 2011

Craft: Faux Bronze Wall Art

I was recently asked to participate in the Elmer's Look for Less Challenge. If you know me, you know I love a good craft challenge so without hesitation I said yes. The challenge was to make a copy of something you would find at the store for a fraction of the price. The other stipulation was that I had to use the Elmer's Foam board.

Photo credit: Pottery Barn

I really wanted to see how I could manipulate the foam board and decided on recreating this PB bronze Noel wall art. This piece sells for $149 (currently sold out). My art piece only cost $19 (Foam board - $7, Spray paint - $8, Copper painter's pen - $4). Here's how I did it.

Supplies:
Elmer's Black 20x30 Foam Board
X-Acto Scissors
X-Acto Gripster Knife
X-Acto Cutting Self Healing Mat
Elmer's Painters Copper Leafing Pen
Nail file - you can use fine grain sand paper too
Bronze oil rubbed - spray paint
Pencil

Print out letters N, O, E, L in Bell MT font (size 100o pt). Cut out and tape together. Attach to foam board with low tack tape. Trace letters with pencil onto the foam board.

Cut out letters with x-acto knife. Don't worry if you're letters are not perfect because you're making a rustic art piece . Cut away any stray strips. Gently file edges to make them smoother.

To get the hammered look, I pressed a supper ball into the foam board with a layer of fabric in between. The fabric prevents the foam board from cracking or wrinkling. I recommend testing the process out on your scraps first to figure out the best pressure. Do this all over the entire piece of wall art. Apply less pressure around the edges as this is where it will most likely wrinkle/crack.

To get that metal finish, apply two coats of bronze oil rubbed spray paint. Let dry for 30 minutes. Dab some of the copper paint onto a paper plate. Dab paper towel into paint. Lightly rub the paint in a circular motion over the entire sign. Avoid getting the paint into the dents of your sign. Do this until it's completely covered. You should still be able to see the bronze paint a little. Make sure to apply copper paint to all edges as well. Apply one more coat of the spray paint but only mist it this time so the copper paint still shows through.

Your final piece should looks something like this.

So I'm sure you all have the same question, does it really look like metal? The answer: yes it really does! I asked my husband too for an unbiased opinion. If you have it in a bright sunny room it may look questionable. But, I'm confident it will fool most people. I would suggest displaying it on a high shelf.

I'll be hosting a giveaway tomorrow for some of the Elmer's products. Please come back Thursday to enter!

Tuesday, December 6, 2011

Owlways Christmas Printables


Jinjerup and My Owl Barn have teamed up again to bring you these cute Owlways Christmas Printables for free. The set features gift wrap, gift tags, note cards, and envelopes! I think the note cards would be perfect for writing a letter to Santa.

Sunday, December 4, 2011

Printable Holiday List

Making a List? Checking it twice? Then head over to Allsorts to print out these adorable "A Jolly Holiday List" for free. These would be perfect for kids to use for their holiday wish lists. Find the free printable list here.

And while you're there, check out Jenny's virtual Gingerbread house. This has been on her site for a couple years now. It's my daughters absolute favorite thing to play on the computer. You just drag and drop candy to decorate the gingerbread house. It's perfect for preschool age. Find this gingerbread house on the right hand side bar of her site.

Friday, December 2, 2011

It's Beginning to Look a Lot Like Christmas

Does this look familiar?

Last weekend I decorated the house for Christmas. Every year I let the kids decorate the tree first with their ornaments. The end result is always something like the picture above. All the ornaments end up in a giant clump and there are always a couple ornaments pulling down the tree branches. Sometimes the ornaments even touch the floor because they were hung to far out on the branches. It's pretty comical. Later on, I go back in and add some ornaments and spread them out a little.

Besides decorating, we're already in Christmas party mode. We have our first party to attend this weekend. Can you believe it? I tried to find another cute vintage dress to wear but had no luck. So I had to go with plan B, the mall. After going blind from all the sequins and glitter in the stores, I finally settled on this dress (found it at a department store for $50). Oh, how I love a deal!

Do any of you have your holiday decorations up yet? Are you in full swing of the holidays?
Zakka Life has moved to a new site!

Click here to visit the new site.