Home About Press Crafts Recipes
Showing posts with label Halloween. Show all posts

Tuesday, October 30, 2012

Printable Frankenweenie Masks

 Photo via Spoonful

Did any of you see the movie Frankenweenie?  I never got a chance to see it but I stumbled upon these masks and thought they would make a good last minute costume.  Since the movie is in black and white all you need are black, white and grey clothes to match the masks.   You can get the free download for the masks at Spoonful.

Hope you all have a Happy Halloween. 

Sunday, October 28, 2012

It's A Halloween Costume Miracle!


All I can say is that it's some kind of miracle that I finished this Halloween costume in time for the school carnival.  I had planned on starting on this costume a week ago but as you may know, I was in Connecticut attending a funeral instead.  With only two days to buy the fabric, cut the pattern and sew up the costume, I wasn't sure if I could do it.  I already had to cancel my daughters birthday party due to the funeral.  I didn't want to have to tell her I couldn't make her costume either.  So, I decided to just go for it. 

Friday, day before carnival: I go online to look over the pattern one more time before I commit.  I notice that the costume is supposed to be hand sewn, ugh.  I also notice in the comments that the foam the pattern calls for is hard to find, double ugh.  I already know I'm going to have to deviate from the pattern.

I get home with the fabric and get to work.  I only stop to pick up the kids from school and make dinner.  Then I go straight back to work.  By 11:30 PM I've cut out all the pieces and have sewn all the green dots on the blue felt.

Saturday, day of carnival:  I wake up at 6:00AM and immediately start laying out the butterfly pattern.  I keep thinking do I try to top stitch it with the sewing machine or, *gulp*, glue it? No, I stick with hand sewing it together (yep, I'm pretty much out of mind at this point).  I hand sew until I have to go to the school to set up the crafts for the carnival.  Come back home, eat, and get back to work. 


I can't believe  I've finished the back of the costume, all hand sewn!  I've got two hours until I need to be at the carnival.  At this moment I feel like I'm on a Halloween episode of Project Runway minus the cameras and snarky competition.  I've got two options, glue the pieces on or leave it blank.  I make the call to glue on the front pieces.  After all, I don't want her mistaken for a moth or bat after all the trouble I've gone through thus far.

I sew both set of wings together, stuff with foam, and sew up the opening. Next, I glue on the pieces and let it dry as I get ready.  And up to the very last minute (no exaggeration) I sew on the elastic straps.  I grab a handful of safety pins, shove them in my pocket and run out the door.

Mission accomplished!

Thursday, October 18, 2012

Halloween Printables

If you're like me, you gravitate to cute Halloween decor.  And these Halloween printables are about as cute as it gets.  Joy from Creative Mamma created this set that includes customizable postcards and mini cards.  Stop by Joy's site to get the free download.

More Halloween Printables:

Halloween Card by A Fanciful Twist

Mini Cards by Babalisme

Party Invitations & More by Catch my Party

Halloween Masks by Mr. Printable


Tuesday, October 16, 2012

The Knit Wig


You know what feels great?  Checking off an item you have on your Pinterest board as done. I've been wanting to make this wig ever since I saw it on Knitty.  Well, I finally found the time plus reason (Halloween) to knit it.  And now that I've checked it off the to-do list, I'll be moving on to this butterfly costume.  Wish me luck.

For those wondering, the wig is pretty easy to knit.  I would say it's just a little more complicated than a hat.

Are any of you making costumes?   Please share.  You might inspire someone!


Thursday, October 11, 2012

Glow In The Dark Lucky Stars

Look what I found at Kinokuniya,  glow-in-the-dark lucky star paper!  Have you heard of such a thing?  I've seen a lot of glow-in-the-dark products but never paper or lucky star paper for that matter.    Well, for $2.50 I had to test it out.

Like a child with a new toy I closed myself into the closet to see the paper glow but nothing happened.  So I figured they just needed to charge up with some light.  After a few good hours of sunlight, I tested the paper out again.  Still nothing happened.  I was starting to think I got a dud but I refused to give up.  Finally, I decided to take the paper out of the package.  And low and behold that's all I needed to do.

*This paper is shorter than most lucky star paper.  It's only about six inches long.  It's barely enough to fold the stars.

And here they are, all in their glorious glow-in-the dark state.  

These little stars might come in handy for Halloween as part of a costume or decorations.  One could dress up in all black and glue these on to make star constellations.  Or you could make them into  bracelets for children when they go trick-or-treating.  Curious, what would you use them for?

If you've never seen lucky stars before, check out this tutorial on how to make them.

Sunday, September 30, 2012

No Carve Pumpkin Faces


After making these pumpkin faces, I realized they look a lot like the annoying orange.   The actual idea came to me when I was brainstorming different ways to decorate a pumpkin without carving it.  I think these pumpkins came out pretty funny looking.  My kids tell me they look creepy.  I guess that's a good thing since they're for Halloween.

This craft is great for all ages, child and adult.  Also, it only requires 4 items: a mini pumpkin, glue stick, scissor, and magazine.  Brief instructions below.

Cut out a bunch of mouths, eyes, noses, etc from magazines.  I found catalogs and makeup advertisements had the best selection of faces.

Play around with different combinations to make silly or scarry faces.   Once you figure out the face you want to make, adhere the pieces with a glue stick to your pumpkin.  I found a glue stick works best because it doesn't make the paper wrinkle.  It also gives you a little time to move the pieces around before they dry.


What do you think, silly or creepy?  Both?


Sunday, September 23, 2012

JELL-O Jack O' Lanterns

Just for fun I decided to whip up some pint size JELL-O jack o lanterns. It's hard to tell from the photo but this mini jack o' lantern is filled with jello.  What keeps the jello from spilling out is making it into a thicker texture.  It may look complicated but these mini jack o' lanterns are easy to make.  Directions below.

JELL-O Jack O' Lantern Recipe
Makes about 15 jack o' lanterns

Ingredients

2 3oz boxes of Lemon JELL-O
2 Cups Water
15 Clementines
Candied Ginger or Chocolate chips

1.  Slice top of clementine off.

2.  Run tip of spoon between edge of rind and fruit.  Slowly pry the fruit out while keeping the rind in tact.  This is surprisingly easy to do and took me about 30 seconds per clementine.  Save the fruit for a snack or serve with jack o' lanterns.

3.  If you have a hole at the bottom of your rind, you will need to plug it with a piece of candied ginger or chocolate chip point size down.  Make sure it will not float to the top when you pour your jello into the rind.

  4.  Boil 2 cups of water.  Add both packets of jello.  Mix till dissolved. 

Before pouring your jello, I recommend placing all the rind cups in a muffin tin with the top beside each cup (pictured above).  This way all your tops will match up.

5.  Pour jello to the top of clementine cup.  Place in fridge.  Let jello set up.  It took about three hours for the jello to set up.


6.  Carve out a face with a pairing knife.  Place top back on.

I discovered if you place a flashlight behind the clementine they light up just like a jack o' lantern.  This might be a fun way to serve or display the jello. 


Monday, September 17, 2012

Vintage Halloween Votive

Hope it's not too early for one little Halloween craft post?  I've just had the holiday on my mind lately.  My son is already suggesting costumes and I've been thinking about what craft I'm going to have the kids do for our school carnival.  So needless to say, that's lead to a lot of ideas such as these Vintage Votive Candles.

This craft was inspired by Fellow Fellows' houses by night.  They're pretty much constructed the same way only they're Halloween images instead of houses.  I'm just going to share brief instructions on how I made them.  If you need a visual, check out Fellow Fellows' blog.

Supplies:

Glass candle votive
Tape
Scissors
Vintage Clip art - The images that work out the best have a good about of white space in them.  The clip art I used came from The Graphics Fairy blog.  Here are the links for the Raven, Owl and Girl Witch.

Directions:

1.  Print out images on standard printer paper.  You might need to adjust the size of an image depending on your votive.

2. Cut image out and wrap around glass votive.  Tape paper together in the back.

3.  Add a tea light.

*Never leave candles unattended.  The paper can get hot.

 Another idea would be to use haunted houses or grave stone photos/illustrations.


Tuesday, November 1, 2011

Halloween Costume Reveal

Can you guess what I am now? No? It's okay, you're not the only one. My goal was to dress up in the Japanese Sweet Lolita fashion. Unfortunately, I think it fell a little flat. So, when someone asked what I was, I just said I was dressed like a doll (much easier to explain). Below is a picture of what I was going for.

Photo credit: New People


I think if I had more time and was able to get that hair volume, that would of helped. Also, my accessories were lacking. I had planned on getting some shoes from the thrift store and painting them pink but I couldn't find any round toed shoes in my size.

I should point out, I found a fabulous tutorial for how to style my hair on Violet Lebeaux.

Here's a better close up of the dress. I found the dress at the thrift store for three dollars. I had to alter it a little, after all it was a child size 8! I opened up the side seams and added pink satin panels. I also had to open up the seam on the sleeves. To make it look more finished I hand sewed lace to the sleeves and the bottom of the dress. As for the pink skirt, I found that at The Children's Place.

Now, I'm deciding whether to give this another go next year. I've got a whole year to think about it.

Last time I ask this, anyone dress up? If you posted about it, share a link in the comments and I'll stop by.

Monday, October 31, 2011

Sneak Peek of my Halloween Costume

Thought I would give you guys a sneak peek at my costume. In case you can't tell, those are plastic nails. FYI, I haven't worn fake nails since probably junior high so this should be interesting. I just hope they stay on.

To make the nails, I started out with a basic french nail kit. I made the bows out of polymer clay and painted them with pink nail polish. Last, I just glued some rhinestones to the nails.

I'm still working on the finishing touches of my costume so I'm not sharing it today. Hopefully I'll have a picture for you tomorrow if all goes well. Anyone have any guesses on what I might be? Anyone else dressing up? What are you going as?

Monday, October 17, 2011

Angry Birds Costume

Over the weekend I decided to make my son's Halloween costume. I probably should have been resting and taking it easy but I'm just not good at that. I really dislike being idle. Even when I'm watching TV, I have to knit or something. Plus, I have to admit it was a lot of fun making the costume. I think there's something great about a handmade costume, even if it's only a sheet with two holes cut out for eyes. It just brings me a lot of joy to be able to create something for my son that he likes. I think I'm going to miss these days when he gets older.

I found the angry birds costume tutorial on Twin Dragonfly Designs. Not only is there a tutorial for the red bird, but there's also a tutorial for the pig, yellow bird, black bird and blue bird! Even if you're not planning on making a costume, you should check it out. I think Heather deserves a visit simply for all the work she put into making those tutorials. She even made some patterns to print out.

One costume down, two more to go! I still need to make a fawn fairy costume for my daughter and one costume for me. I'm not sure if my costume is going to work out so I'm keeping it under wraps for now. If it works out, I promise I'll share about it.

Anyone planning on dressing up for Halloween/Harvest Festival? What are you going to be?

Sunday, October 9, 2011

Craft: Mummy Lollipops

Today I'm crafting with one of my all time favorite supplies, Japanese masking tape. I realized the layering of the tape is perfect for emulating mummy wrapping. So after a little brainstorming, I decided to make some mummy lollipops. These are extremely easy to make, even kids can make them. The lollipops would be great to give out for Halloween treats or use for a party.

Supplies:
Japanese masking tape - light grey
Flat packaged lollipops
Googly eyes
Glue dots - I used Elmer's glue spots
Scissors

1. Apply googly eyes with glue dots.

2. Start applying tape. I cut the tape in half for thinner strips.

3. Cover the entire front side of lollipop with tape. Slightly cover the googly eyes with tape for a more realistic effect. Make sure to press tape down well. You don't want your mummies unraveling.

4. Cut corners to make a rounded mummy shaped head. Make sure not to break the package seal when cutting around the corners.


Do you celebrate Halloween? What are you crafting for the holiday? Costumes?

Thursday, October 28, 2010

I'm Addicted to Candy Corn!

Now that I've knit one of these cute little candy corns, I'm completely addicted. They're so easy and relatively quick to make. I think I'm going to whip a whole batch for my daughters play kitchen. I found the free pattern on Mochimochi Land by the talented Anna Hrachvoec.

If you've never knit with double pointed needles before, here's a great video to help you get started.


What are you guys knitting right now?

Sunday, October 17, 2010

Sealed With a Spider

I was flipping through the new October issue of Martha Stewart Living and was inspired by the "fine specimens section". I especially liked the idea of the fossil cookies (sorry, couldn't find a picture online). It was basically a cookie pressed with plastic bugs to make a fossil impression. Well, all those bugs got me thinking of those cheap spider rings, you know the ones. And, soon the idea of spider rings turned into spider seals. Here's what I did:

I found this 50 pack of spider rings at the dollar store. I cut off the ring part with a pair of scissors. Regular scissors work fine.

Then I just dripped some red wax from a candle onto the center of the envelope. Pushed the spider into the wax to make sure it would hold. Last, I just let it dry. Easy.

These would make great seals for any Halloween party.

Tuesday, October 5, 2010

Halloween Craft: Chalkboard Pumpkins

Where has chalkboard paint been all my life?! After using it for this craft project I'm completely hooked. And I can tell you, it's going to take all my crafty restraint not to paint the entire house with it because I love it that much. That said, don't be surprised if there's more chalkboard paint posts in the future because I'm already brainstorming.

As you can guess, I painted a pumpkin with some chalkboard paint. What I like about this project is that you can keep the pumpkin for years to come. Also, children can participate in this craft by drawing on the pumpkin. If they mess up, no problem, just erase and draw again.

Brief "how-to" below:

Supplies:
Craft Pumpkin
Painters Tape
Chalkboard Spray Paint - comes in orange too!

Cover pumpkin stem with painters tape. Spray pumpkin with about three coats of paint. Let dry for 24 hours. Start drawing.

Tuesday, September 28, 2010

Handmade Halloween Costumes

Meet the knitting fairy, with a wave of her wand she can pick up dropped stitches and rejuvenate wonky sweaters. Just for fun I was brainstorming ideas for Halloween costumes and this was one of them. I like the idea of a costume revolved around handmade. Truthfully though, I probably won't make this. Unless I have some party to go to, I'll probably stick with my tried and true Little Red Riding Hood costume. But if I was going to go all out, this is what I'd do:


Now this is a costume that will win you first place at a Halloween party. M.A.C. artist Karin Stone created this real life Roy Lichtenstein comic character.

Via Charmed


This is another costume I love, "low resolution". But if I were to make this, I'd make the squares smaller. I'd also draw squares on a light colored dress to keep the pixelation theme going. I actually suggested this costume to my husband this year and he thought I was completely out of my mind. Honestly, if he thought this was weird, he should have seen me with the ball of yarn wrapped around my head yesterday. Purely for costume R & D (research and development) of course.

Via Make


What crafty person can't resist the tomato pincushion costume? Pure awesomeness, right?

via My Paper Crane


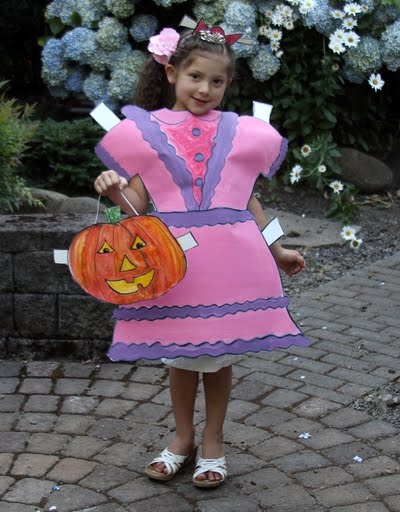
And here's something for the kids, a paper doll costume. What's great about this costume is how easy and inexpensive it is to make. This would also make a great family themed costume. Everyone could be paper dolls.

Via Dollar Store Crafts


So, what fabulous costumes are you guys making this year?

Sunday, November 1, 2009

10 Things To Make with Halloween Candy

Every year I face the dilemma of what to do with all the Halloween candy. I always feel too guilty to throw it away. I try to incorporate it into recipes but instead end up eating a lot of it. So to combat the problem, I've rounded up 10 DIY projects for leftover Halloween candy plus one candy wrapper project.

Thursday, October 15, 2009

Edible Mini Jack O' Lanterns

I was peeling a clementine when it occurred to me that they look like mini pumpkins. At first I thought it would be fun to add a little green paper stem to the top of one. As I thought over the idea it evolved into mini jack o' lanterns. I got out my edible markers and quickly went to work. First I washed the fruit to make sure there was no wax or residue on the skin. Then I just drew a cute little face onto the clementine. If you can't find clementines, oranges will do.

I can't wait to slip one into my son's lunch box and surprise him!

Sneak a few into the fruit bowl and see if anyone notices.

Friday, October 9, 2009

Kid Craft: Mrs. Pumpkin Head

This year we're keeping it kid friendly around here for Halloween (no spooky decorations). So instead of the traditional carved pumpkin, we're making Mr. & Mrs. Pumpkin Heads. What's great about this project is one, you don't have to hollow out the pumpkin. Two, your kids get to make the pumpkin instead of just watching. And three, it's fun for kids. My daughter played with her pumpkin for a good 45 minutes.

Supplies:
Mr. Potato Head Pieces - if you don't have any, check your local thrift store or borrow some from a friend
Screw Driver
One pumpkin

With the screwdriver, puncture holes for the eyes, nose, mouth, ears, arms, hat, and feet. Make sure the potato head pieces fit well. Place pieces in the holes just like a Mr. Potato Head. Done

Chill with your pumpkin.
Zakka Life has moved to a new site!

Click here to visit the new site.