

I created this HTML button without knowing how to write HTML code. When I first started researching how to make these buttons I could never find a good tutorial. All the tutorials out there just showed me how to make text chicklets. I wanted to use my own image. So I figured out a super easy way to make image html buttons. Here's the process.
*Disclaimer - I do not write HTML code. I am not an expert. I simply figured this out and wanted to share it with everyone.
The first thing you will need is a photobucket account, click here. It's free and easy to set up.
Why Photobucket? Photobucket provides a code for you that can easily be altered. Plus you will need a place to store your image.
Choose an image you want for a button. I recommend saving it in the jpeg format. Also, you will want your image to be the actual pixel size of how you want to view it. For example the button above is 100px by 100px. This button size works well because it fits on most blog sidebars.
After you upload your picture in photobucket, click on the image. In the bottom, right hand corner of your screen you should see this box.
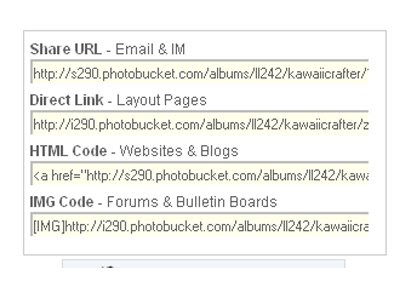 Right Click on the code titled "HTML Code - Websites & Blogs" and click copy. Save the code somewhere you can alter it. I saved it in Word.
You will now have a code that looks like this.

"click on above image to see better"
Now replace the highlighted area with the web address you want your button to link to. Which I'm guessing would be your site's address.
NEW Next replace alt="Photobucket" with atl="Your site's name". Whatever words you replace with Photobucket will show in case the picture is not available for some reason. That's it, you have now created the html code for your button.
*One last thing, to display the code for people to see you'll need to drop it into a code box. This is very easy to do as well. Here's the link that gives you the code for the box. You might need to scroll down a little to see it.
If you have any questions feel free to leave a comment or email me. I'll do my best to answer any questions.
*Disclaimer - I do not write HTML code. I am not an expert. I simply figured this out and wanted to share it with everyone.
The first thing you will need is a photobucket account, click here. It's free and easy to set up.
Why Photobucket? Photobucket provides a code for you that can easily be altered. Plus you will need a place to store your image.
Choose an image you want for a button. I recommend saving it in the jpeg format. Also, you will want your image to be the actual pixel size of how you want to view it. For example the button above is 100px by 100px. This button size works well because it fits on most blog sidebars.
After you upload your picture in photobucket, click on the image. In the bottom, right hand corner of your screen you should see this box.
 Right Click on the code titled "HTML Code - Websites & Blogs" and click copy. Save the code somewhere you can alter it. I saved it in Word.
You will now have a code that looks like this.

"click on above image to see better"
NEW Next replace alt="Photobucket" with atl="Your site's name". Whatever words you replace with Photobucket will show in case the picture is not available for some reason. That's it, you have now created the html code for your button.
*One last thing, to display the code for people to see you'll need to drop it into a code box. This is very easy to do as well. Here's the link that gives you the code for the box. You might need to scroll down a little to see it.
If you have any questions feel free to leave a comment or email me. I'll do my best to answer any questions.
Awesome tutorial! Very helpful indeed. :)
ReplyDeleteThanks so much. I think I'll cut and paste this into a document so that I can refer to it later on. Does it have to be photobucket or can flickr work too?
ReplyDeleteNow, this is one of the best advise I've read, very2 interesting...just might try it.
ReplyDeletehappy weekend :)
Sounds interesting ..will try it out!
ReplyDeleteoh great tutorial i have to learn this too!
ReplyDeleteAWESOME tutorial! Thanks,
ReplyDeleteChristine Bean
www.christinebean.com
Thanks! I actually understood that tutorial. I'm sooo computer illiterate.
ReplyDeleteMarcia, so glad to hear that the tutorial is easy to understand. Thanks for leaving a comment! They're always appreciated.
ReplyDeletethis is a great tutorial! i can't wait to try it...thanks for stopping by my blog!
ReplyDeleteThat's a fantastic how~to, Kawaii!
ReplyDeleteI'm going to be using this tonight. :D
That is so cool yup well look for some kind of imag for a button want to thank you so much for the tutorial on this awesome clear and going to make a button am so happy always wanted to do this!
ReplyDeleteBRILLIANT!!! Thankyou SO much for this! I am thrilled!!!
ReplyDeletengaire b,
ReplyDeleteyour welcome!
let me know if you have any questions
This was FREAKING AWESOME!!! I've been wanting this for quite sometime & your tutorial made it SO easy! Thanks a million!
ReplyDeleteFantastic...thank you so much!
ReplyDeleteRobin
http://www.creations-anew.com
I was wondering how to add the code box. :-) Thanks for sharing! :-)
ReplyDeleteFarrah from...
www.wifeandmomof3.net
www.tbfreviews.wordpress.com
WOW, I'm a computer moron and you made that so easy even I could do it!! Thank you!
ReplyDeleteTHANK YOU!!!! I recently asked another blogger how to make a button, and she told me, "It was a lot of work, and it required me to learn photo editing software. You can probably find a book at your local library."
ReplyDeleteRiiiiight.
So thank you for the simple instructions! You can view the button I made at http://jadeinmywindow.wordpress.com. It's the Health Nut button. :)
thanks for this one! i dont know html that much, so a simple guide is best for me...
ReplyDeleteThis was beyond helpful! IT was easy to understand and I was able to make my own button in no time at all.
ReplyDeleteJust wanted to thank you for doing these tutorials!
I can not thank you enough for this.I thought it was a big secret how this was done!!!! Really really cool of you to share!
ReplyDeleteSharing is GLAMOROUS. You are a lifetime member now!
Okay seriously. I just did it. And it worked.
ReplyDeleteI am amazed!
Thanks again. Really.
very helpful...for the code the link you gave isn't working in my blog so I searched for another..thank u very much! check out my new button...
ReplyDeleteThank you for this information! It has been so helpful!
ReplyDeletePeace. Love. Light.
ohmygosh...thank u soooo much!! I have been trying to figure out how to do this for a while now. So glad to have found your post :D
ReplyDeletethanks! this is so helpful!
ReplyDeleteThanks for posting this! So helpful!
ReplyDeleteWonderful tutorial!! Extremely Easy!! I had my button on my blog in 15mins. Thankyou!!!
ReplyDeleteArigato Gozaimasu!!! thank you very much! can pls teach on the code box..
ReplyDeleteI made one with a text grab box. Thanks for the tutorial, I tried to write one as well. Check it out.
ReplyDeletethanks! this totally worked! i linked to your blog!!!
ReplyDeleteI had been looking for a tutorial just like this one. Thanks.
ReplyDeleteI linked to you (it posts Monday). Thanks for the easy explanation!
ReplyDeleteThank you for the info. It makes my quest easy. I already made a code before was being taught then by my friend but this time I have now my first badge with my first code of it. Thanks.. I just only change the row into 4 and the cols into 20. Thanks again. Cool tutorial. :-)
ReplyDeleteHi! Thank you for this great tutorial!
ReplyDelete:)
This is awesome!!!!!! Thank you...how do I get text on my badge (over my picture)?
ReplyDelete~Mandy
thank you thank you u saved my life haha :D
ReplyDeleteTHANK YOU!!!!!!!!!!!
ReplyDeleteYou are so awesome! I was able to post a button for my blog because of you. Thanks so much!
ReplyDeleteGreat post! Very easy to do! Your instructions were awesome! Thank you!
ReplyDeleteGreat, easy to follow tutorial. Ready to add to my site now.
ReplyDeleteThanks so much, you made it easy to follow & i'm so chuffed I've made a blog badge!
ReplyDeleteJan x
Fantastic Tutorial!! Best out there! Thank you so much!!
ReplyDeleteWOW!!! Thank you so much for publishing this post! I now have a badge on my new{er} blog!!!
ReplyDeleteThank you, thank you, thank you!!!
I have to join the excited chorus of all these other folks! Thank you, thank you, thanks you. Without your amazing and easy post to follow I am sure my computer would have been in teeny tiny little pieces!
ReplyDeleteThanks for posting this info. You made it so easy.
ReplyDeleteHi! Thank you for your help. I been trying to google this for a week, I'm glad that i found your blog.
ReplyDeletethank you for this great post, i made my badge in like 5 minutes! so so helpful
ReplyDeleteI used this and it worked. Did mine in Flickr. Thanks so much for sharing the knowledge!!
ReplyDeleteElizabeth
weeew!! can't wait to try this one out! thnx for sharing this! :D
ReplyDeleteThanks for sharing this knowledge. Made my badge to help raise funds for charity.
ReplyDeleteGreat tutorial!
Thank you for your instructions for applying badges on to blogs. I have trying to do this for a while and in the last three days have found some helpful advice but yours is the best!
ReplyDeleteHi there..I have a question. I would like to create a link from my badge to a map on google, could you share some advice please.
ReplyDeleteThanks once again for your HTML button tutorial!
It worked a treat :)
hi there, i have a question about making a twitter badge.
ReplyDeleteWhen i have copied the address from a/c at twitter and paste into where i want my link to go to. It shows a different link, i can see my a/c but doesnt take me there directly.
Please help.
thank you! it works great!
ReplyDeletehi! it works for me too!!!
ReplyDeletethanks a lot.
visit me @http://stylobooku.blogspot.com/
Oh my goodness- this is just absolutely fantastic! I've been trying to work out how to make a button for soooo long!
ReplyDelete