Home About Press Crafts Recipes

Thursday, April 30, 2009

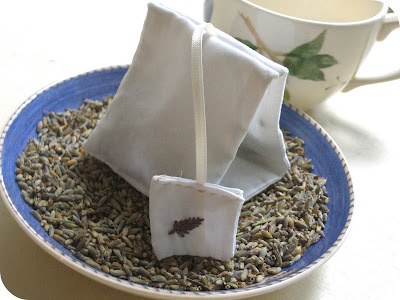
Craft Project: Lavender Teabag Sachets

Here's a gift idea for Mother's Day, lavender teabag sachets. Steep your clothes in the sweet smell of lavender. Perfect to stuff in dresser drawers or linen cabinets.

I've been holding onto this idea for two years now. Why? I just never got a chance to test it out. You see, every time I come up with an idea, I record it in my journal. I draw a picture of the craft plus directions on how I think it would be made. Often I forget about the idea until I page through my journal again. It's kind of like Christmas for me, I open up one of my journals and discover a forgotten project.

Supplies:
Light weight fabric - cotton or linen
Scissors
Thread
Sewing needle or Sewing machine
Dried Lavender
Ribbon
purple embroidery thread (optional)

Click on image for a larger view

1. Cut out 2 rectangles of fabric (8 1/2" by 3"). Pin right sides together. Sew down each side with a 1/4" seam allowance refer to picture. Turn right side out.

2. Sew across the rectangle three inches from the bottom (refer to picture). Add about a tablespoon of lavender.

3. Sew across the rectangle three inches form the top (refer to picture).

4. Fold both sides upwards and fill with about a tablespoon of lavender in each side.

5. Fold top flaps down, roughly 1/4 inch.

6. Hold both sides together(refer to picture).

7. Pull the tea tag ribbon through the top center of the teabag ( refer to picture). Pin in place.

8. Sew across on dotted lines (refer to picture).

9. Turn right side out. Done!

Tea Tag Directions

Cut a piece of fabric 3" by 1 1'2". Fold in half. Sew down sides (refer to picture). Turn right side out. Place ribbon inside the square. Fold in raw edges. Sew closed.

Optional: embroider lavender image on the tag.


Other Mother's Day Ideas

Wednesday, April 29, 2009

Vintage Postcards

Today I received an unexpected gift from a friend, two vintage postcards. They were so lovely that I had to share. Hope you enjoy them too.

While searching the net I also found some vintage Mother's Day postcards. You can find them at Karen's Whimsy. These would be nice to incorporate into a craft project. Now, to just come up with the craft project, hmm. . .

Saturday, April 25, 2009

How to Make Powdered Sugar


My Aunt Susan (same Aunt that made the transformer cake) told me about this tip. Too many times I've ran out of powdered sugar and used granulated sugar in it's place. If I had only known, all I had to do was blend the sugar for a couple of seconds. I could have avoided a lot of frosting disasters.

*I decided to make this video with my camera. It's the first video I've ever made so please excuse the poor quality. It was a little bit of a challenge holding the camera in one hand and making the sugar in the other hand while talking at the same time.

Book Review: Socks from the Toe Up


I recently received the book "Socks from the Toe Up" by Wendy D. Johnson. For those of you not familiar with Wendy, she's well know in the knitting blogging community. She's the author of the blog Wendy Knits: Adventures with sticks and strings. Personally, I always enjoy books from bloggers because I know a bit about them and their style before I even pick up the book. So, I would recommend checking out Wendy's site if you've never been there before.

Now, about the book. Socks from the Toe Up includes over 20 sock knitting patterns. Included in the book are the essential techniques to help you get started knitting socks. What makes this book unique is that it takes a new approach to knitting socks, using the toe up method. Apparently it's supposed to be a better way because it saves yarn, there's no graphing, and it ensures a perfect fit. Pictures below from the book.

Van Dyke Socks

Lace and Cable Socks

Thursday, April 23, 2009

Kid Craft: Seed Bead Ring

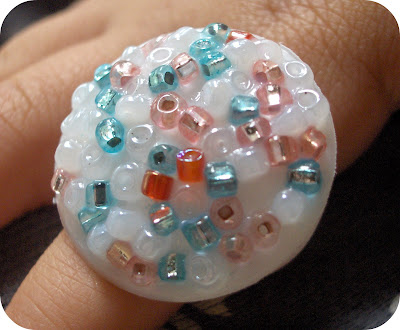
When I was washing the dishes the other day, I discovered a plastic milk carton seal lying on the counter. Instead of picking it up and throwing it away, I began to inspect it. And the more I looked at it, the more it looked like a ring. So today, my daughter and I tested out my craft idea together. It went so well that I couldn't wait to share it with all of you. Simple directions below.

Supplies:
plastic milk/juice carton seal (picture below)
glue
seed beads
acrylic gloss (optional)

Here's where you can find the plastic seal, under the yellow cap.

This is what it looks like.

1. Apply a thick layer of glue to the top of the plastic dome.

2. Place seed beads on top of the dome. My 3 1/2 year old daughter was able to this all on her
own. I also gave her a toothpick to position the beads where she wanted them.

3. Let dry

4. Brush a coat of Gloss acrylic over the beads ( you could substitute with more glue). This will help keep the beads on the ring. Let dry. Slip onto finger.

Other ideas instead of using seed beads: sequins, scraps from magazines, clay, foam stickers, etc. . .

Wednesday, April 22, 2009

Free ebook- Blogging in Pink: A Woman's Guide

Michelle Mitchell from Scribbit has a new ebook out titled "Blogging in Pink: A Woman's Guide". Michelle describes the book as, "for anyone interested in starting a blog or improving your existing blog this 24-chapter guide gives you tips for organizing yourself, getting started, focusing your efforts and taking things to the next level". And here's the best part, it's FREE to download, here!

Some of you might be wondering what makes Michelle such a credible source on the subject. Well for starters, she was ranked as fifth in the list of ten Top Motherhood Blogs in the Wall Street Journal April 10, 2008 "The Blogger Mom in Your Face" by Sue Shellenbarger. She has interviewed Patrick Dempsey and Mary Lou Retton for blog posts. Even recently she was contacted to be on MTV's Teen Cribs. Uh... ya, what more do you need to know? Well, there's one other thing actually, she's one of my blogging friends. I've always found her to be honest and very insightful when it comes to blogging.

Hope you get a chance to check out the book, I think you'll like it.

Tuesday, April 21, 2009

Paper Craft: Teacup Card

Here's an easy card to make for just about any occasion. I'm planning on using it for Mother's Day. It would also make a nice tea party invitation. On the back of the teabag is the message. Simple directions below.

Supplies
White heavy card stock
Scissors
Exacto knife
Glue
String

Right click, copy and save to a program such as Word. Print out teacup template. It's designed to fit on standard letter size paper.

Cut out teacup and rectangle. Fold both in half so they line up as perfect as possible. Unfold.

Apply glue to teacup (refer to picture). Fold together. Let dry.

Cut out a piece of paper the same size as the tea bag. Tape the string to the paper. Cover up the string by taping the teabag to the paper. Tape string to the inside of the rectangle template and glue shut.

Write message on back. Hopefully your message will look nicer than the one above. Now just tuck the teabag/message into the teacup. Done.

Monday, April 20, 2009

Mother's Day Gifts: Teacup Votives

Here's a new approach on the teacup candle. Instead of using an adult size tea cup, use a teacup from a child's set. They're the perfect size for a votive candle. The tea cup above is 1 1/2" tall. I'm thinking it would be a nice gift for Mother's day wrapped up as a set. It would be even more special, if you could give a teacup from your childhood.

*Look for child teacups at yard sales and thrift stores.

And the winner is. . .


Congratulations to Treaclezoo, you're the winner of the Crobots giveaway!

* Above is the dress I wore to the wedding. I had my husband snap this shot before we left for the wedding. I realize it's not the best picture, oh well. I should also clarify that I bought the dress, I did not sew it. After reading some of your comments from the previous post, I realized it might have appeared that I was sewing the dress.

Friday, April 17, 2009

Wedding Aisle Decorations


Thought I would share with you what I've been up to for the past two weeks. I've been busy making these wedding aisle decorations for my sister in law's wedding. You might remember these flowers from the post, here. The flowers are about the size of my hand and are sewed to some cream ribbon. The wedding is this Saturday so I hope they work out (keeping my fingers crossed).

sneak-peek of the dress I'll be wearing to the wedding. I usually stick to solids with texture for dresses but decided to try something new this time. We'll see how it goes.

* There's still time to enter the Crobots (crocheted robots) book giveaway, here.

Wednesday, April 15, 2009

Life Hack: Coffee Cup Cozy

I've been seeing a lot of patterns to make coffee cup cozies online. I was thinking of making one until I came up with this idea. Just use a sock (preferably a new one) and place it over the cup then fold down. That's it, takes a couple of seconds to do. I used a standard woman's size sock for the cup above.

Tuesday, April 14, 2009

Book Review & Giveaway: Crobots

Crobots is a book filled with 20 amigurumi (crochet) patterns to make different kinds of bots (dogbot, bopbot, zombiebot, mechanobot, retrobot, boxbot, bigbot, babybot, comsic bear, thinker, wheely, space mouse, alienbot, bouncebot, martyoshka, ninjabot, catbot, girliebot, sumo, and geisha). The crochet patterns are marked from beginner to advanced. Included in the book are illustrations and instructions on basic crochet stitches to help you get started making these cute bots.

This would be a good book to have for making gifts for boys ( some girls too of course). When the book arrived at the house, my five year old boy was already requesting which "bot" he wanted me to make. His favorite was the ninjabot. Even my husband made a comment on how it was a "cool book". That's the first time my husband has ever showed any interest in any of my craft books!

*One thing to note, lots of the projects have small pieces such as beads and metal incorporated into the patterns. I would not give these to a child under 4 unless for display purposes only.

Ninjabot - my son's favorite

Geisha

Dogbot

How to enter the Giveaway
Leave a comment on your thoughts about Crobots at the bottom of this post no later than Sunday, April 19th, 2009. One entry per person. Please leave a way for me to get back to you if you win(enter your email address in the comment form). The email address is only used to notify the winner, I do not save the addresses. I'll choose one winner at random and post their name Monday. Good Luck!

Contest is now closed

Sunday, April 12, 2009

Happy Easter

Friday, April 10, 2009

Craft Project: Bunny Treat Boxes

I found a pattern for these cute bunny cubes, here. I turned the cubes into boxes that could open and close. They would be cute to fill with Easter treats. There's also some chicks and other animals like the cubes above.

Some tips for making them:
Click here, for all the patterns. Click on the one you wish to print. Go to print preview. Scale them to 125%. Then print. To make them into boxes just add an extra tab to the top flap.


Here's another project from the site. Had to share, it's just so kawaii!

Wednesday, April 8, 2009

Craft Project: Tea Canister Cuff Bracelet

I made this bracelet out of a tin tea canister. It was an experiment and it came out pretty good, not perfect. It could use a little improvement in that the cuff is not perfectly smooth. I'm still going to post directions below in case anyone is curious how I made it. Perhaps some of you can share your tips for working with tin. Directions below.

Starting with a tin canister, take it apart with needle nose pliers and craft scissors. I recommend wearing gloves when you do this to protect your hands.

* a good source for tin canisters is the thrift store

Cut out a piece of tin with some heavy duty craft scissors. Decide how wide you would like the cuff then add two centimeters. For length, measure your wrist or another bracelet you own.

Cut the tin piece into the shape of the solid lines. Fold on the dotted lines. Basically you're folding the edges in so there's no rough edges. To fold the metal, score the fold line with a ruler and sharp object (I used a knitting needle). Use needle nose pliers to fold the metal. Cover the metal with a bandanna when folding to prevent marking up the tin. The folded edges should be in the inside of the bracelet.

Last, bend the bracelet into a shape of a cuff. I recommend bending it around something round like a small jar or pole. When bending, make sure not to kink the metal ( this was the hardest part for me). Done.


featured on

Tuesday, April 7, 2009

Book Review: Martha Stewart's Encyclopedia of Crafts


If you haven't heard, the "Martha Stewart's Encyclopedia of Crafts" is out. I just received my copy of the book last week and I can't sing its praises enough. Just paging through the book has my mind spinning with ideas. It's filled with just about every craft technique imaginable (beading, scrap booking, gilding, marbleizing, etc.). Along with the craft techniques you'll find craft projects with step by step directions, pictures, and patterns. There's even a tools, materials, and sources directory. This craft book truly has it all, great projects, beautiful photos, and 400 pages of inspiration.

Glitter Eggs
This might be the year I actually make these for Easter.

Crepe Paper Birds

Monday, April 6, 2009

And the winner is. . .

Congratulations to Serif, you are the winner of the Origami Card Craft Giveaway!

Friday, April 3, 2009

Craft Project: Hedgehog Pom Pom

About a week back a reader (Nina) asked me if I had any craft projects on hedgehogs. The answer was no so I decided to come up with something. Well after a little thought, I decided to make a pom pom hedgehog. It came out just as planned (and trust me, that's rare).

Simple directions below to make a hedgehog pom pom.

Supplies:
Brown and Cream yarn
Cream Felt
Brown embroidery floss
Fabric glue
sewing needle
scissors

Wind brown and cream yarn around two fingers at the same time. Cut yarn.

Now wind just the cream yarn around your fingers slightly overlapping the other yarn.

Slide yarn off your fingers. Secure yarn by tying a strand around the center of the ball. If you've never made a pom pom before, there's detailed directions here. Cut the loops as usual. Trim into an oval shape.


Left picture - what the top of the pom pom should look like.
Right picture - what the bottom of the pom pom should look like.

With a small piece of felt, cut and shape into a cone. Sew together. Embroider the nose and eyes on the cone. Glue the cone with fabric glue to the the pom pom. Refer to pictures. Done.

Zakka Life has moved to a new site!

Click here to visit the new site.