Home About Press Crafts Recipes

Tuesday, September 28, 2010

Handmade Halloween Costumes

Meet the knitting fairy, with a wave of her wand she can pick up dropped stitches and rejuvenate wonky sweaters. Just for fun I was brainstorming ideas for Halloween costumes and this was one of them. I like the idea of a costume revolved around handmade. Truthfully though, I probably won't make this. Unless I have some party to go to, I'll probably stick with my tried and true Little Red Riding Hood costume. But if I was going to go all out, this is what I'd do:


Now this is a costume that will win you first place at a Halloween party. M.A.C. artist Karin Stone created this real life Roy Lichtenstein comic character.

Via Charmed


This is another costume I love, "low resolution". But if I were to make this, I'd make the squares smaller. I'd also draw squares on a light colored dress to keep the pixelation theme going. I actually suggested this costume to my husband this year and he thought I was completely out of my mind. Honestly, if he thought this was weird, he should have seen me with the ball of yarn wrapped around my head yesterday. Purely for costume R & D (research and development) of course.

Via Make


What crafty person can't resist the tomato pincushion costume? Pure awesomeness, right?

via My Paper Crane


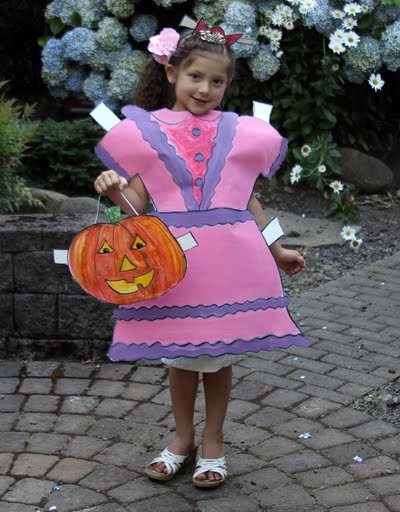
And here's something for the kids, a paper doll costume. What's great about this costume is how easy and inexpensive it is to make. This would also make a great family themed costume. Everyone could be paper dolls.

Via Dollar Store Crafts


So, what fabulous costumes are you guys making this year?

Sunday, September 26, 2010

Tuesday, September 21, 2010

Simmered Kabocha Recipe

Today is officially the first day of fall. So to kick off the season, I would like to share one of my favorite recipes with you, simmered Kabocha (pumpkin). I found the recipe in one of my favorite cook books, "The Joy of Japanese Cooking" by Kuwako Takahashi. Ever since I discovered the recipe, it has become a staple in our kitchen menu. Perhaps it will be one of yours too.

Simmered Kabocha
Recipe from The Joy of Japanese Cooking


Ingredients:
1 1/2lbs Kabocha (pumpkin) - pictured above
1 1/2 cup dashi - you can make it from scratch with bonito flakes but I like to use 1/2 cup Yamaki Mentsuyu (pictured above) with 1 cup water. If you really wanted to, you could replace the dashi with chicken broth.
3 T Mirin (rice wine)
1-2 T Sugar
1/2 tsp Salt
1/2 T Soy Sauce

Cut kabocha into small pieces (about 1" x 1 1/2"). Round edges of skin with a peeler. You can eat the skin of a kabocha so you don't have to peel all of it off. Rounding the edges is more for aesthetics.

Place kabocha skin side down in a large pot. Mix rest of ingredients together and pour into pot.

Cover with lid and bring to boil.

Turn heat down and simmer for 10 - 15 minutes. Cook until tender. Make sure kabocha does not get mushy.

Turn off heat and let the kabocha soak up the dashi. You can serve this dish hot or at room temperature. Often I like to make it for bentos as a side dish.

Enjoy!


Sunday, September 19, 2010

Handmade is Beautiful

The other day I was shopping at the mall and I overheard a woman say, “I wouldn’t wear anything that looks like I made it” (referring to a chunky knit sweater). The comment kind of stopped me in my tracks. What did that mean? Did she say that because anything she made wouldn’t look good? Did she say it because she finds more value in mass produced products? Sadly, I suspect the latter. There’s this view that handmade equals ugly, too poor to buy clothes, cheap, fill in the blank_________.

Now, as for me I have a very strong opposing opinion. I’ll be honest and say that I'm biased since I like to make things. But here’s the thing, when I look at something handmade I see a one of a kind item that no one else has. I see an item that is far superior in craftsmanship. I see an item that someone put a lot of care, thought, love and time into. I see an item that is beautiful, expensive, and rare. So YES, I'll proudly wear something handmade any day!

Friday, September 17, 2010

Giveaway: Bread Cell Phone Charm

I've always been curious about these faux breads that I've seen online. So, you could imagine my delight when I stumbled upon one at my favorite store. As soon as I saw it I knew just what to do with it, host a giveaway! One lucky reader will win this faux bread cell phone charm. It looks just like a miniature bread, it's squishy and even smells like bread!

To enter the giveaway, please leave a comment telling me your favorite kind of pastry. One entry per household. Please leave an email address so I can contact you if you win. The last day to enter the contest is Monday, September 20, 2010. I'll announce the winner Tuesday on this post and email them. If I do not hear back from the winner after two weeks, I will choose a new winner. International friends welcome :)

Congratulations to Peggy who is the winner of the giveaway! Peggy's favorite pastry is red bean paste bun!

Contest Closed

Tuesday, September 14, 2010

Kid Craft: Playdough Bling Rings

Today we made some rings out of playdough, rhinestones, and one unusual supply, Ring Pop bases. You know, those candy rings that look like giant gemstones. Well, I discovered they work great for making playdough rings. Here's what we did:

Supplies:
Playdough - see recipe below
Rhinestones or beads
Plastic rings from ring pops

Playdough Recipe

1/2 cup salt
1 cup flour
1 cup water
2 Tbsp Oil
2 Tbsp Cream of Tartar
food coloring

1. Mix flour, salt, oil and cream of tartar in a medium size pot. Add water slowly.

2. Heat on medium until playdough begins to gets thick.

3. Place onto wax paper to cool. Knead dough to desired texture.

4. Add food coloring.

Store in an airtight container. Lasts up to 2 - 3 weeks.

Stack playdough on ring base, add some rhinestones and you've made a playdough bling ring. Let dry or take apart to make another ring.


Sunday, September 12, 2010

Printable "Photos, Please Do Not Bend" Labels

Do you write "Photos: Please Do Not Bend" on your envelopes when you send pictures in the mail? I do and I'll be honest with you; I'm not really sure if it makes any difference? Do the mail carriers read these notes? Do they take any extra care delivering your package? Is writing "do not bend" the equivalent of having a "baby on board" sign on your car? I may never know the answers to these questions but I rather be safe. Recently I had a lot of photos to send out and instead of writing "Do Not Bend" I decided to make some stickers I could just stick on the packages. So in the case you're like me, I'm sharing the clip art with you guys and a quick "how-to".
Right click, copy, save and print on 8 1/2" x 11" sticker paper. You can purchase printable sticker paper at most office supply stores. Cut out images.

Friday, September 10, 2010

Hand Sewn Bird Ornament

If this bird looks familiar to you, that's because you probably saw it on Spool back in 2008 (has it been that long?). I've always admired the pattern but was never sure what to do with the birds until now.

For this ornament I shrunk down the pattern to 75% because I was concerned it would be too big for a Christmas ornament. Now that I've made it, I think the original size will work just fine.

For the pattern visit the Spool Blog and look for the bird pattern in the right sidebar.

What ornaments are you guys making for Christmas? Don't pretend you haven't thought about it. I know some of you started in July or earlier!

Tuesday, September 7, 2010

Kid Craft: LEGO Capes

I'm pretty sure that at any given time of day, there's a LEGO or two lying out on the floor. I don't think they ever "really" get put away. So since we like LEGO's around here so much, I decided to make some accessories for them. These capes are super easy and quick to make. Here's the how-to:

Cape Template
Right click, copy, save, print and cut out the cape template. You may need to adjust the scale.

Cut out some felt capes with the template.

Fold cape in half lengthwise and make a small slit. You'll want the hole just big enough to fit over the neck.

Embellish if you wish.

Start playing!


Friday, September 3, 2010

Furikake Chex Recipe

If you like Japanese rice crackers, than I'm pretty sure you'll like this recipe. It's a sweet/salty combination with a hint of nori (seaweed) flavor. The great thing about this sanck is it can easily be altered to your liking. You don't have to use chex; I've seen this made with bugles and sesame crackers as well.

Furikake Chex Recipe

Ingredients:
1 12.8 oz box of rice chex cereal
4 Tbsp Butter
1/4 C Clear Karo Syrup
1/4 C Vegetable Oil
1/4 C Sugar
1Tbsp Soy sauce
1 tsp Garlic Powder
Furikake (rice seasoning) - pictured above, can be found at most Asian markets

1. Combine all ingredients except the chex and furikake in a pot. Mix thoroughly and bring to boil.

2. Pour over chex and mix well making sure the chex is evenly coated.

3. Place the mixture on a large cookie tray. Sprinkle with furikake.

4. Bake at 250 and turn mixture every 10 -15 minutes for one hour. Let cool.

Enjoy!


Wednesday, September 1, 2010

Craft: Applique Patch Hair Clips

This project is so easy, I can barely call it a craft but since it has to be labeled as something, a craft it is. I was out doing some back-to-school shopping when a cute hair clip caught my eye. Upon further inspection I discovered it was just an applique patch glued to a hair clip. So, I'll give you one guess how I made these. . .

Supplies:
Applique patches - can be found at craft and fabric stores
Hair clips
E6000 glue - I used this because it's strong, durable and flexible. Any extra strength glue should work fine.

As you all have probably figured out, I just glued the appliques to the hair clips. I was thinking fabric stickers would work well too, such as the Jolee boutique stickers. Or perhaps some vintage army patches, girl scout patches, etc. might be fun. It just depends on your style.

Zakka Life has moved to a new site!

Click here to visit the new site.