Home About Press Crafts Recipes

Wednesday, November 30, 2011

Craft: Washi Tape Ornaments

You know what I love about washi tape? You can transform the most basic item with just a little bit of it. Have plain white paper? Add a little tape and it's stationary! Have some old glass ornaments lying around, now they're fresh and contemporary! Try it out and see, your household items may never be the same again. Or in this case, your Christmas ornaments may never be the same again.

Supplies:
Glass ornaments ( old scratched ornaments are great for this project)
Washi Tape

Cut or rip the tape and apply it to the ornaments anyway you wish. One of the wonderful qualities of washi tape is that it's semi translucent which creates a wonderful overlapping effect. You can kind of see what I'm talking about with the Christmas tree ornament. I experimented with shapes, monograms and just random ripped squares. If you don't like what you make the first time, just peel the tape off and start again. Washi tape is low tack so it won't leave a sticky residue.

Warning, these are really addictive to make!

Sunday, November 27, 2011

Pom-Pom Monster Salon Giveaway

Klutz recently sent us the Pom Pom Monster Salon to test out. The book/kit comes with directions on how to make 13 different monsters, a pom pom maker, styling comb, glue, accessories for the monsters and yarn. The only other thing you will need to make the monsters are scissors.

The kit is for ages 8 and up but I had both my children (ages 6 & 8) make the pom poms. They were able to measure the yarn (book comes with a built in ruler) and wrap the yarn around the pom pom maker. I ended up cutting the yarn for them because the pom pom maker can come apart while cutting. My 8 year old probably could do it completely on his own but since we were all just learning how to make them, I helped out.

The book shows techniques on how to incorporate different colors into the pom poms. In the picture above we made a green monster with an orange mohawk out of one pom pom.

Out of all the craft kits we've tried out, this is the one kit my kids have been the most excited about so far. Everyday they're asking me if they can make more pom pom monsters.

*One important thing to note is that the kit provides only enough yarn for about 5 monsters. I recommend having an extra ball of yarn on hand in case you want to make more monsters. You can make the monsters with acrylic yarn which is reasonably priced ($3 a ball).

Arts, Crafts, & Laughs! KLUTZ books are the Perfect Holiday Gift for any Child! With Pom-Pom Monster Salon, anyone can make pom-poms and turn them into stylish monsters. Use our exclusive pom-pom maker and follow our cutting and styling instructions to create perfectly coifed mop tops, afros, pigtails, and mohawks to name a few. Add tiny hair bows, punch out feet, and foam horns and teeth for the final touches.

Find Klutz on Facebook

Get 20% off your entire order - Shop Klutz.com and use coupon code KLUTZ4U
Promo can not be combined with any other offer. Offer expires 12/31/11

On to the Giveaway. . . two lucky readers will win a Pom-Pom Monster Salon. To enter, please share your best pom-pom monster name. One entry per household. Please leave an email address so I can contact you if you win. The last day to enter the contest is Saturday, December 3 2011. I'll announce the winner Sunday, December 4 2011 on this post. If I do not hear back from the winner after two weeks, I will choose a new winner. Open to US residents only.

Contest Closed

Congratulations to Michelle L. and Tina Reynolds who are the winners of the Pom-Pom monster salon kits!

Thank you to everyone who entered.

Saturday, November 26, 2011

Black Tie Friday

I did something a little unconventional for Black Friday this year and attended a Black Tie Wedding. It was held at Casa Real at the Ruby Hill Winery, the perfect setting for a wedding. We enjoyed the night with good food, wine, conversation and some dancing.

This is the dress I wore to last night's wedding. This picture is actually from a wedding we attended at the Old Mint in San Francisco on new years eve. We basically looked the same, just maybe a little older now.

Normally I like to spend Black Friday decorating the house for Christmas. For whatever reason, I've never got into going shopping on that day. How about you? Do you like to go shopping for the deals? Anyone go shopping at midnight or stand in line for a day? Please share your stories in the comments.

Tuesday, November 22, 2011

What I've Been Knitting

For the longest time now I've been wanting a pair of hand warmers. The only thing holding me back was that I thought I was too old for them. I know this might sound strange but for some reason I associate handwarmers with teenagers. I really have no explanation for this. Maybe it's because I've never seen an adult wearing them. Come to think of it, I've never seen anyone wearing them. I'm sure our California weather has something to do with that. Anyways, I decided to get over the whole age appropriate dilemma and knit a pair. Let me just say, I'm so happy I did! They are cozy and warm and will be perfect for when I walk the kids to school. I even find myself wanting to wear them in the house.

There are so many patterns out there for hand warmers, fingerless gloves, fingerless mittens or any other name they go by. I found the pattern for these on the Purl Bee. I made mine two inches shorter than the pattern called for. The pattern is very easy to follow. If anyone is curious, I used Debbie Bliss aran tweed 100% wool to knit them.

While searching for patterns, I stumbled across a pattern on CRAFT for the handwarmers Alice wore in New Moon. Since The Twilight Saga: Breaking Dawn just recently came out, I thought these might be fun to knit for a Twilight fan. Might make a nice Christmas present too. Just thought I would share.

Photo credits go to my six year old daughter. I had her take the pictures since I obviously couldn't use my hands. I had to do some editing but I think they came out quite nice. Plus, she had fun using mommy's camera.

Monday, November 21, 2011

For The Kids Table

Photo Credit: Fiskars

Lately I've been seeing a lot of great kid ideas for Thanksgiving. If you need some last minute inspiration, here are a few of my favorites. The directions for making the table setting above can be found on the Fiskars site.

One Charming Party shows you how to make this adorable faux pumpkin pie filled with small toys. Too clever!

Printable Paper Crafts is offering up this Thanksgiving printable set to download for free. Stop by their site to see what else it includes.

Find the how-to for these finger puppets on the Martha Stewart site.

Have any crafty ideas up your sleeves for Thanksgiving? Please share.

Friday, November 18, 2011

Book Review: Make and Takes for Kids

Make and Takes for Kids by Marie LeBaron

I'm so excited to be sharing with you today Make and Takes for Kids by Marie LeBaron. For those not familiar with Marie, she owns the craft blog Make and Takes. I've been visiting her site for years now so I was pretty excited to find out she published a kids craft book.

Make and Takes for Kids includes fifty projects to make crafts and food with kids. The crafts and recipes are tailored for each month of the year. The crafts are easy enough for preschoolers but also engaging enough for a 9 year old. What I like about the book is that most of the projects can be created out of things you already have in your house. I could probably make at least half of the projects now without having to run to the store.

Below are a few of our favorite projects from the book. Photo credit: Nicole Gerulat

Spring Banner made with egg shells.

When you want to have a camp fire inside.

Mini Umbrella - I asked my 6 year old daughter which projects she liked best and this was one of them.

This is a fan my daughter made from the book. She made it on her own except for me tying the ribbon on it. It came out a little different than the book's fan because I let her do it on her own. I try not to be too controlling when it comes to kid crafts. It is art after all.

Wednesday, November 16, 2011

Craft: Denim Pom Poms

Give me a D!
Give me an E!
Give me a N!
Give me an I!
Give me an M!
What does that spell? Denim!

I had an old pair of worn out jeans to play with and decided to make some pom poms with them. I really like how you can see the wrong side of the denim. I think it gives the pom poms some added depth and texture. I deiced to use them to adorn a gift. They're the perfect replacement for a bow.

Supplies:
piece of denim 4" x 12"
String - I used twine
Scissors

1. Cut denim on black lines like the picture above. This will give you one continuous piece of denim string. I recommend making the width just a little less than 1/4 inch and about 3 yards in length.

2. Wrap the denim string around three of your fingers. Keeping the loops intact, slide it off your hand.

3. Tie a piece of string around the center as tight as you can. You don't want your pom pom falling apart. Cut the loops (refer to picture).

4. Fan out edges. Trim pom pom if necessary. The more you trim it, the fuller it will look.

Your pom pom should now look something like this.

I have another tutorial for how to make pom poms with photos if that's more helpful. Click here, if you want to see it.

Monday, November 14, 2011

Craft: Inkblot Ornaments

This inkblot ornament was inspired by an episode of Project Runway of all things. If you kept up with last season's show, then you're probably familiar with episode 7 that featured an inkblot dress. Now where I translated that into Christmas ornaments, I'm not too sure. But in some strange way I was able to make it work (sorry, couldn't resist slipping that in). Directions below.

Supplies:
White cotton fabric cut into 4" x 4" squares
White thread
Thick felt
Beads
Acrylic Paint
Wax Paper
Ribbon


(Click on images for a larger view)

1. Place paint in center of fabric and fold fabric. Spread paint out while the fabric is still folded by pressing on it. Unfold. Let dry on wax paper.

2. Once dry, cut around the edge leaving a 1/4" seam. If necessary, iron.


3. Sew on beads however you want. I played on the reflective qualities of the ink blots and had the beads mirror each other.

4. Sew on a thick piece of felt to the back of the ornament. This will cover up all the stitching from the beads and make the ornament more sturdier. While sewing the felt on, sew in a piece of ribbon to the top of the ornament. Last, trim felt to the shape of the cotton fabric. Done

Other ideas - make an inkblot Christmas tree with green paint and sew on round beads as ornaments. I also think adding some glitter to the paint would be a nice effect.

Friday, November 11, 2011

Make Free Custom Labels with Labeley

I recently received an email about Labeley from one of the creators, Ana Brady. Once I checked it out, I knew I had to share. Labeley is a site that allows you to make your own beer labels! Not into brewing your own beer? No problem. You can make your labels for anything you want, water bottles, wine bottles, homemade jam, etc. You can also upload your own images and photos. I think this could really come in handy for homemade gifts and birthday parties. It's also completely free to use. Check it out and tell me what you think.

Wednesday, November 9, 2011

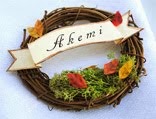
Craft: Mini Wreath Place Card Holder

Who's ready for Thanksgiving? Raise your hand. It seems each year the holiday sneaks up on me quicker than the last. I'm not sure if it's because the holidays are so rushed or if I just have more to do each year. Well, to help you get started for holiday planning, I made these cute place card holders. Now all you have to do is plan the rest, table setting, guest list, dinner. . . etc, etc.

Supplies:
Mini Grapevine wreaths - I purchased the wreaths at Michaels for $.49 each. If you're feeling extra crafty you could make them yourself.

Cream Card stock

Moss - you could also use green yarn in replace of the moss.

Fake leaves - you could also use real leaves and seal them with Modge Podge.

Fabric glue - I used Elmer's Fabric and Paper Glue

Brown watercolor

Brown marker

Okay, lets get started . . .

First step, glue a little moss to the bottom of your wreath. I wrapped it from front to back (refer to picture).

Print name out on card stock. I used a font size of 37 points but it will vary depending on the font. I also did a little kerning (completely optional).

Cut out name in the shape of first picture. Fold on dotted lines. Cut ends on solid lines. Your name tag should now look something like the second picture.

Unfold name tag and paint the outer edges with watercolor. Next, run a dark brown maker around the edge. Refold. This will give it a little more depth and age. You can distress the paper more if you want.

Glue name down on wreath (refer to top picture).

Cut out some mini leaves out of a fake fabric leaf. With a fine tip marker, draw some veins on the leaves for a more realistic effect. Don't worry about making them perfect. Leaves don't come in one shape or size.

Now using a pair of tweezers, glue the leaves on the wreath with the fabric glue. Refer to picture for placement. Done.

*Other idea - thread a ribbon on the top back of the wreath to turn it into an ornament. This way, you could send them home with guests as a functional keepsake.

Sunday, November 6, 2011

Japanese Craft Book for Making Tassels

ISBN978-4-07-269890-7

A while back I mentioned I purchased this craft book in Japantown but realized I never showed you the inside of it. Sorry about that. So, today I thought I would share a few favorite projects from the book. I hope you will find them as inspiring as I do.

Tassels made from embroidery thread and wooden beads.

These little acorns would be great for decorating a table. I could also see them attached to some twine to make a cute set of Thanksgiving napkin rings.


I can envision an entire tree covered in these fur tassels. By the way, have you noticed how popular fur is this year? I was in Restoration Hardware the other day and the store was covered in fur everything. They even had faux fur bean bag chairs!

Want to make a bow look extra special? Why not add a tassel to it. This would be just stunning on a gift wrapped in silver.

The book includes ideas for using the tassels on socks, as garland, and even jewelry. If time wasn't an issue, I would make a bunch of tassels and hang them everywhere. Just for fun.

Thursday, November 3, 2011

Printable Kokeshi Calendar

You know I love just about anything kokeshi doll right? Well, Joy Charde from Creative Mamma created a new kokeshi doll 2012 mini calendar. The calendar is available on her site to download for free! If you have time and ink to spare, stop by and print it out.

Tuesday, November 1, 2011

Halloween Costume Reveal

Can you guess what I am now? No? It's okay, you're not the only one. My goal was to dress up in the Japanese Sweet Lolita fashion. Unfortunately, I think it fell a little flat. So, when someone asked what I was, I just said I was dressed like a doll (much easier to explain). Below is a picture of what I was going for.

Photo credit: New People


I think if I had more time and was able to get that hair volume, that would of helped. Also, my accessories were lacking. I had planned on getting some shoes from the thrift store and painting them pink but I couldn't find any round toed shoes in my size.

I should point out, I found a fabulous tutorial for how to style my hair on Violet Lebeaux.

Here's a better close up of the dress. I found the dress at the thrift store for three dollars. I had to alter it a little, after all it was a child size 8! I opened up the side seams and added pink satin panels. I also had to open up the seam on the sleeves. To make it look more finished I hand sewed lace to the sleeves and the bottom of the dress. As for the pink skirt, I found that at The Children's Place.

Now, I'm deciding whether to give this another go next year. I've got a whole year to think about it.

Last time I ask this, anyone dress up? If you posted about it, share a link in the comments and I'll stop by.
Zakka Life has moved to a new site!

Click here to visit the new site.